User Guide
Contents
Notice
The Total Compute 2022 (TC2) software stack uses bash scripts to build a Board Support Package (BSP) and a choice of Buildroot Linux distribution or Android.
Prerequisites
- These instructions assume that:
Your host PC is running Ubuntu Linux 20.04;
You are running the provided scripts in a
bashshell environment.
To get the latest repo tool from google, run the following commands:
mkdir -p ~/bin
curl https://storage.googleapis.com/git-repo-downloads/repo > ~/bin/repo
chmod a+x ~/bin/repo
export PATH=~/bin:$PATH
- To build and run Android, the minimum requirements for the host machine can be found at https://source.android.com/setup/build/requirements, These include:
At least 250GB of free disk space to check out the code and an extra 150 GB to build it. If you conduct multiple builds, you need additional space.
At least 32 GB of available RAM/swap.
Git configured properly using “git config” otherwise it may throw error while fetching the code.
To install and allow access to docker, run the following command:
sudo apt install docker.io
# ensure docker service is properly started and running
sudo systemctl restart docker
sudo chmod 777 /var/run/docker.sock
NOTE: to manage Docker as a non-root user, run the following command:
sudo groupadd docker
sudo usermod -aG docker $USER
newgrp docker
Download the source code and build
- There are two distros supported in the TC2 software stack:
Buildroot (a minimal distro containing Busybox);
Android.
Download the source code
Create a new folder that will be your workspace, which will henceforth be referred to as <tc2_workspace>
in these instructions.
mkdir <tc2_workspace>
cd <tc2_workspace>
export TC2_RELEASE=refs/tags/TC2-2023.04.21
To sync Buildroot source code, run the following repo command:
repo init -u https://gitlab.arm.com/arm-reference-solutions/arm-reference-solutions-manifest -m tc2.xml -b ${TC2_RELEASE} -g bsp
repo sync -j `nproc` --fetch-submodules
To sync Android source code, run the following repo command:
repo init -u https://gitlab.arm.com/arm-reference-solutions/arm-reference-solutions-manifest -m tc2.xml -b ${TC2_RELEASE} -g android
repo sync -j `nproc` --fetch-submodules
NOTE: synchronization of the Android code from Google servers may fail due to connection problems and/or to an enforced rate limit related with the maximum number of concurrent fetching jobs. The previous commands assume that the maximum number of jobs concurrently fetching code will be a perfect match of the number of CPU cores available, which should work fine most of the times. If experiencing constant errors on consecutive fetch code attempts, please do consider deleting your entire workspace (which will ensure a clean of the support .repo folder containing the previously partial fetched files), by running the command cd .. ; rm -rf <tc2_workspace> and repeat the previous commands listed in this section to recreate the workspace (optionally, also reducing the number of jobs, for example to a maximum of 4, by adopting the following command repo sync -j 4 --fetch-submodules).
- Once the previous process finishes, the current
<tc2_workspace>should have the following structure: build-scripts/: the components build scriptsrun-scripts/: scripts to run the FVPsrc/: each component’s git repository
Initial Setup
- The setup includes two parts:
setup a docker image;
setup the environmet to build TC images.
Setting up a docker image involves pulling the prebuilt docker image from a docker registry. If that fails, it will build a local docker image.
To setup a docker image, patch the components, install the toolchains and build tools, run the following listed commands.
For the Buildroot build:
export PLATFORM=tc2
export FILESYSTEM=buildroot
./setup.sh
For the Android build with hardware rendering:
export PLATFORM=tc2
export FILESYSTEM=android-fvp
export TC_GPU=true
export TC_TARGET_FLAVOR=fvp
export GPU_DDK_REPO=<PATH TO GPU DDK SOURCE CODE>
export GPU_DDK_VERSION=r40p0_01eac0
export LM_LICENSE_FILE=<LICENSE FILE>
export ARM_PRODUCT_DEF=<PATH TO ELMAP FILE IN ARMCLANG>
export ARMLMD_LICENSE_FILE=<LICENSE FILE>
export ANDROID_TEST_EXAMPLES=<PATH TO GPU DDK TEST EXAMPLES>
export ARMCLANG_TOOL=<PATH TO ARMCLANG TOOLCHAIN>
./setup.sh
For the Android build with software rendering:
export PLATFORM=tc2
export TC_GPU=false
export TC_TARGET_FLAVOR=fvp
export FILESYSTEM=android-fvp
./setup.sh
The various tools will be installed in the tools/ directory at the root of the workspace.
To build Android with Android Verified Boot (AVB) enabled, run the following command to enable the corresponding flag in addition to any of the two previous Android command variants (please note that this needs to be run before running ./setup.sh):
export AVB=true
NOTES:
If building the TC2 software stack for more than one target, please ensure you run a clean build between each different build to avoid setup/building errors (refer to the next section “More about the build system” for command usage examples on how to do this).
If running
repo syncagain is needed at some point, then thesetup.shscript also needs to be run again, as repo sync can discard the patches.Most builds will be done in parallel using all the available cores by default. To change this number, run
export PARALLELISM=<number of cores>
Build options
Android OS build
tc2_fvp with
TC_GPU=false: this supports Android display with swiftshader (software rendering);tc2_fvp with
TC_GPU=true: this supports Android display with Mali GPU (hardware rendering). GPU DDK source code is available only to licensee partners (please contact support@arm.com).
The Android images can be built with or without authentication enabled using Android Verified Boot (AVB) through the use of the -a option.
AVB build is done in userdebug mode and takes a longer time to boot as the images are verified.
This option does not influence the way the system boots, rather it adds an optional sanity check on the prerequisite images.
Android based stack takes considerable time to build, so start the build and go grab a cup of coffee!
Build command
To build the whole TC2 software stack, simply run:
./run_docker.sh ./build-all.sh build
- Once the previous process finishes, the current
<tc2_workspace>should have the following structure: build files are stored in
<tc2_workspace>/build-scripts/output/tmp_build/;final images will be placed in
<tc2_workspace>/build-script/output/deploy/.
More about the build system
The build-all.sh script will build all the components, but each component has its own script, allowing it to be built, cleaned and deployed separately.
All scripts support the build, clean, deploy, patch commands. build-all.sh also supports all, which performs a clean followed by a rebuild of all the stack.
For example, to build, deploy, and clean SCP, run:
./run_docker.sh ./build-scp.sh build
./run_docker.sh ./build-scp.sh deploy
./run_docker.sh ./build-scp.sh clean
The platform and filesystem used should be defined as described previously, but they can also be specified as the following example:
./run_docker.sh ./build-all.sh -p $PLATFORM -f $FILESYSTEM -t $TC_TARGET_FLAVOR -g $TC_GPU build
Build Components and its dependencies
A new dependency to a component can be added in the form of $component=$dependency in the dependencies.txt file
To build a component and rebuild those components that depend on it, run:
./run_docker.sh ./$filename build with_reqs
Those options work for all the build-*.sh scripts.
Provided components
Firmware Components
Trusted Firmware-A
Based on Trusted Firmware-A
Script |
<tc2_workspace>/build-scripts/build-tfa.sh |
Files |
|
System Control Processor (SCP)
Based on SCP Firmware
Script |
<tc2_workspace>/build-scripts/build-scp.sh |
Files |
|
U-Boot
Based on U-Boot gitlab
Script |
<tc2_workspace>/build-scripts/build-u-boot.sh |
Files |
|
Hafnium
Based on Hafnium
Script |
<tc2_workspace>/build-scripts/build-hafnium.sh |
Files |
|
OP-TEE
Based on OP-TEE
Script |
<tc2_workspace>/build-scripts/build-optee-os.sh |
Files |
|
S-EL0 trusted-services
Based on Trusted Services
Script |
<tc2_workspace>/build-scripts/build-trusted-services.sh |
Files |
|
Linux
The component responsible for building a 5.15 version of the Android Common kernel (ACK).
Script |
<tc2_workspace>/build-scripts/build-linux.sh |
Files |
|
Trusty
Based on Trusty
Script |
<tc2_workspace>/build-scripts/build-trusty.sh |
Files |
|
Distributions
Buildroot Linux distro
The layer is based on the buildroot Linux distribution. The provided distribution is based on BusyBox and built using glibc.
Script |
<tc2_workspace>/build-scripts/build-buildroot.sh |
Files |
|
Android
Script |
<tc2_workspace>/build-scripts/build-android.sh |
Files |
|
Run scripts
Within the <tc2_workspace>/run-scripts/ there are several convenience functions for testing the software
stack. Usage descriptions for the various scripts are provided in the following sections.
Obtaining the TC2 FVP
The TC2 FVP is available to partners for build and run on Linux host environments. Please contact Arm to have access (support@arm.com).
Running the software on FVP
A Fixed Virtual Platform (FVP) of the TC2 platform must be available to run the included run scripts.
The run-scripts structure is as follows:
run-scripts
|--tc2
   |--run_model.sh
   |-- ...
Ensure that all dependencies are met by running the FVP: ./path/to/FVP_TC2. You should see
the FVP launch, presenting a graphical interface showing information about the current state of the FVP.
The run_model.sh script in <tc2_workspace>/run-scripts/tc2 will launch the FVP, providing
the previously built images as arguments. Run the ./run_model.sh script:
./run_model.sh
Incorrect script use, call script as:
<path_to_run_model.sh> [OPTIONS]
OPTIONS:
-m, --model                      path to model
-d, --distro                     distro version, values supported [buildroot, android-fvp]
-a, --avb                        [OPTIONAL] avb boot, values supported [true, false], DEFAULT: false
-t, --tap-interface              [OPTIONAL] enable TAP interface
-n, --networking                 [OPTIONAL] networking, values supported [user, tap, none]
                                 DEFAULT: tap if tap interface provided, otherwise user
-e, --extra-model-params         [OPTIONAL] extra model parameters
Running Buildroot
./run-scripts/tc2/run_model.sh -m <model binary path> -d buildroot
Running Android
For running Android with AVB disabled:
./run-scripts/tc2/run_model.sh -m <model binary path> -d android-fvp
For running Android with AVB enabled:
./run-scripts/tc2/run_model.sh -m <model binary path> -d android-fvp -a true
For running Android with hardware rendering enabled:
./run-scripts/tc2/run_model.sh -m <model binary path> -d android-fvp -e '--plugin=<crypto.so>'
NOTE:
crypto.so is part of your FVP bundle.
Expected behaviour
- When the script is run, four terminal instances will be launched:
terminal_uart_apused by the non-secure world components U-boot, Linux Kernel and filesystem (Buildroot/Android);terminal_uart1_apused by the secure world components TF-A, Hafnium, Trusty and OP-TEE;terminal_s0used for the SCP logs;terminal_s1used by RSS logs (no output by default).
Once the FVP is running, hardware Root of Trust will verify AP and SCP images, initialize various crypto services and then handover execution to the SCP. SCP will bring the AP out of reset. The AP will start booting from its ROM and then proceed to boot Trusted Firmware-A, Hafnium, Secure Partitions (OP-TEE, Trusted Services in Buildroot and Trusty in Android) then U-Boot, and then Linux and Buildroot/Android.
When booting Buildroot, the model will boot Linux and present a login prompt on terminal_uart_ap. Login
using the username root. You may need to hit Enter for the prompt to appear.
When booting Android, the GUI window Fast Models - Total Compute 2 DP0 shows the Android logo and on boot completion,
the window will show the Android home screen.
When booting Android with Android Verified Boot (AVB=true), the GUI window will display an error, as illustrated in the related Total Compute Platform Expected Test Results document section. This is expected with the current TC release.
Running sanity tests
OP-TEE
For OP-TEE, the TEE sanity test suite can be run using command xtest on the terminal_uart_ap.
Please be aware that this test suite will take some time to run all its related tests.
NOTE: This test is specific to Buildroot only. An example of the expected test result for this test is ilustrated in the related Total Compute Platform Expected Test Results document section.
Trusted Services and Client application
For Trusted Services, run the command ts-service-test -sg ItsServiceTests -sg PsaCryptoApiTests -sg CryptoServicePackedcTests -sg CryptoServiceProtobufTests -sg CryptoServiceLimitTests -v for Service API level tests, and run ts-demo for the demonstration of the client application.
NOTE: This test is specific to Buildroot only. An example of the expected test result for this test is ilustrated in the related Total Compute Platform Expected Results document section.
Trusty
On the Android distribution, Trusty provides a Trusted Execution Environment (TEE).
The functionality of Trusty IPC can be tested using the command tipc-test -t ta2ta-ipc with root privilege
(once Android boots to prompt, run su 0 for root access).
NOTE: This test is specific to Android only. An example of the expected test result for this test is ilustrated in the Total Compute Platform Expected Test Results document section.
Microdroid demo
On the Android distribution, Virtualization service provides support to run Microdroid based pVM (Protected VM). For running a demo Microdroid, boot TC FVP with Android distribution. Once the Android is completely up, run the following command:
export ANDROID_PRODUCT_OUT=<tc2_workspace>/src/android/out/target/product/tc_fvp/
./run-scripts/tc2/run_microdroid_demo.sh
NOTE: This test is specific to Android only. An example of the expected test result for this test is ilustrated in the related Total Compute Platform Expected Test Results document section.
Kernel Selftest
Tests are located at /usr/bin/selftest on the device.
To run all the tests in one go, use ./run_kselftest.sh script. Tests can be run individually also.
./run_kselftest.sh --summary
NOTE 1: KSM driver is not a part of the TC2 kernel. Hence, one of the MTE Kselftests will fail for check_ksm_options test.
NOTE 2: This test is specific to Buildroot only. An example of the expected test result for this test is ilustrated in the related Total Compute Platform Expected Test Results document section.
MPAM
The hardware and the software requirements required for the MPAM feature can be verified by running the command testing_mpam.sh on terminal_uart_ap (this script is located inside the /bin folder, which is part of the default $PATH environment variable, allowing this command to be executed from any location in the device filesystem).
NOTE: This test is specific to Buildroot only. An example of the expected test result for this test is ilustrated in the related Total Compute Platform Expected Test Results document section.
BTI
To run the BTI unit test, navigate to <tc2_workspace> and run:
adb connect 127.0.0.1:5555
cd <tc2_workspace>/src/android/out/target/product/tc_fvp/testcases/bti-unit-tests/arm64
adb push bti-unit-tests /data/local/tmp
cd <tc2_workspace>/src/android/out/target
adb push ./product/tc_fvp/obj/SHARED_LIBRARIES/libbti_basic_function_intermediates/libbti_basic_function.so /data/local/tmp
On the terminal_uart_ap run:
cd /data/local/tmp
./bti-unit-tests
NOTE: This test is specific to Android builds with hardware rendering configuration enabled (i.e. TC_GPU=true). An example of the expected test result for this test is ilustrated in the related Total Compute Platform Expected Test Results document section.
MTE
To run the MTE unit test, navigate to <tc2_workspace> and run:
adb connect 127.0.0.1:5555
cd <tc2_workspace>/src/android/out/target/product/tc_fvp/testcases/mte-unit-tests/arm64
adb push mte-unit-tests /data/local/tmp
On the terminal_uart_ap run:
cd /data/local/tmp
./mte-unit-tests
NOTE: This test is specific to Android builds with hardware rendering configuration enabled (i.e. TC_GPU=true). An example of the expected test result for this test is ilustrated in the related Total Compute Platform Expected Test Results document section.
PAUTH
To run the PAUTH unit test, navigate to <tc2_workspace> and run:
adb connect 127.0.0.1:5555
cd <tc2_workspace>/src/android/out/target/product/tc_fvp/testcases/pauth-unit-tests/arm64
adb push pauth-unit-tests /data/local/tmp
On the terminal_uart_ap run:
cd /data/local/tmp
./pauth-unit-tests
NOTE: This test is specific to Android builds with hardware rendering configuration enabled (i.e. TC_GPU=true). An example of the expected test result for this test is ilustrated in the related Total Compute Platform Expected Test Results document section.
EAS with LISA
This test requires Lisa to be installed. Please refer to the LISA documentation to get more information about the requirements, dependencies and installation process of LISA on your system.
To setup Lisa, please run the following commands:
git clone https://github.com/ARM-software/lisa.git
cd lisa
sudo ./install_base.sh --install-all
The following commands should be run each time LISA is run:
source init_env
export TC_WORKSPACE=<tc2_workspace>
For FVP with buildroot, boot the FVP model to buildroot as you normally would making user user networking is enabled.
exekall run lisa.tests.scheduler.eas_behaviour --conf <path to target_conf_linux.yml>
The following excerpt illustrates the contents of the target_conf_buildroot.yml file:
target-conf:
  kind: linux
  name: tc
  host: localhost
  port: 8022
  username: root
  password: ""
  strict-host-check: false

  kernel:
    src: ${TC_WORKSPACE}/build-scripts/output/tmp_build/linux

    modules:
      make-variables:
        CC: clang
      build-env: alpine

  wait-boot:
    enable: false

  devlib:
    file-xfer: scp
    max-async: 1
NOTE: This test is specific to Buildroot only. An example of the expected test result for this test is ilustrated in the related Total Compute Platform Expected Test Results document section.
Debugging on Arm Development Studio
This section describes the steps to debug the TC software stack using Arm Development Studio.
Creating a new connection
To create a new connection, please follow the next steps:
Select
File->New->Model Connection;Provide the name for the new
Debug Connectionand click thenextbutton;Click on the
Add a new model...button;Select
CADIas the model interface and click thenextbutton;Select
Launch and connect to specific model;Select the location on your system containing the TC2 FVP model path and click the
Finishbutton;Once the import process of the model finishes, you can close the
Model Connectionwindow (used to add the new model).
Attach and Debug
Build the target with debug enabled (the file
<tc2_workspace>/build-scripts/configcan be configured to enable debug);Run Buildroot/Android as described in the section
Running the software on FVPwith the extra parameters-e -Sto attach to the debugger. The full command should look like the following:./run-scripts/tc2/run_model.sh -m <model binary path> -d <buildroot|android-fvp> -e -S
Select the target created as mentioned in
Creating a new connectionandconnect to targetfrom debug control console.After connection, use options in debug control console (highlighted in the below diagram) or the keyboard shortcuts to
step,runorhalt.To add debug symbols, right click on target ->
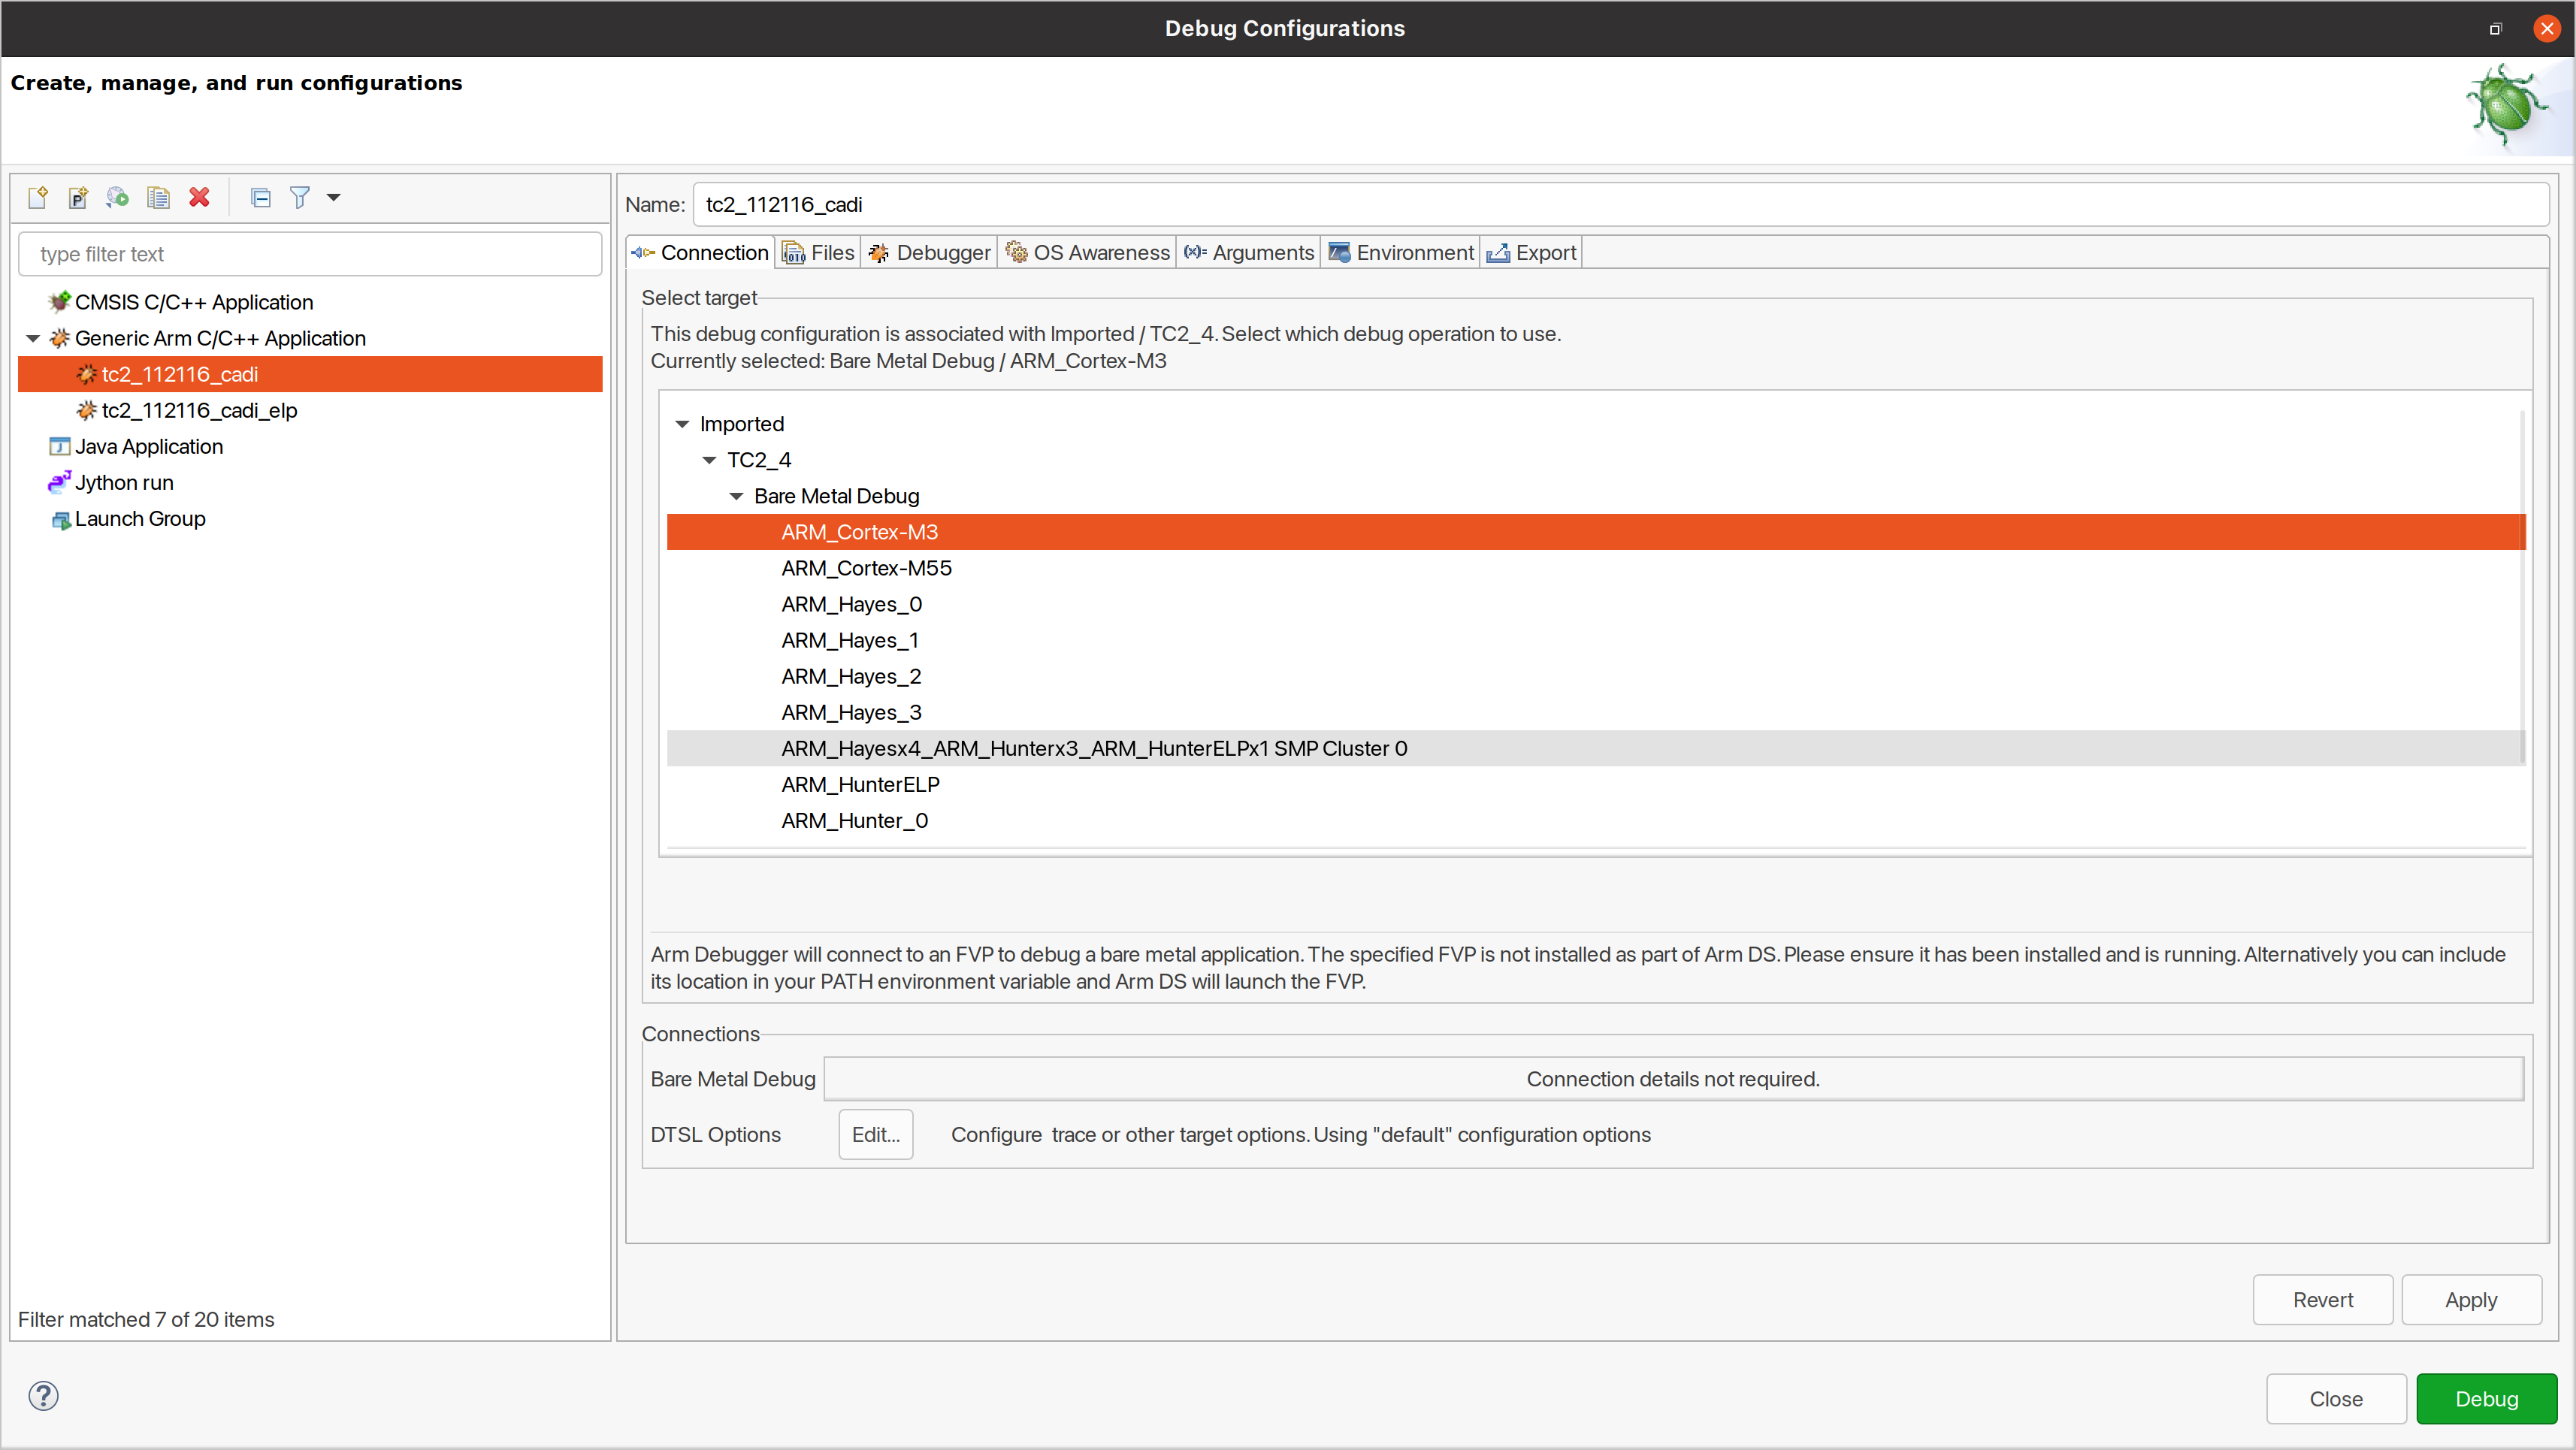
Debug configurationsand underfilestab add path toelffiles.Debug options such as
break points,variable watch,memory viewand so on can be used.
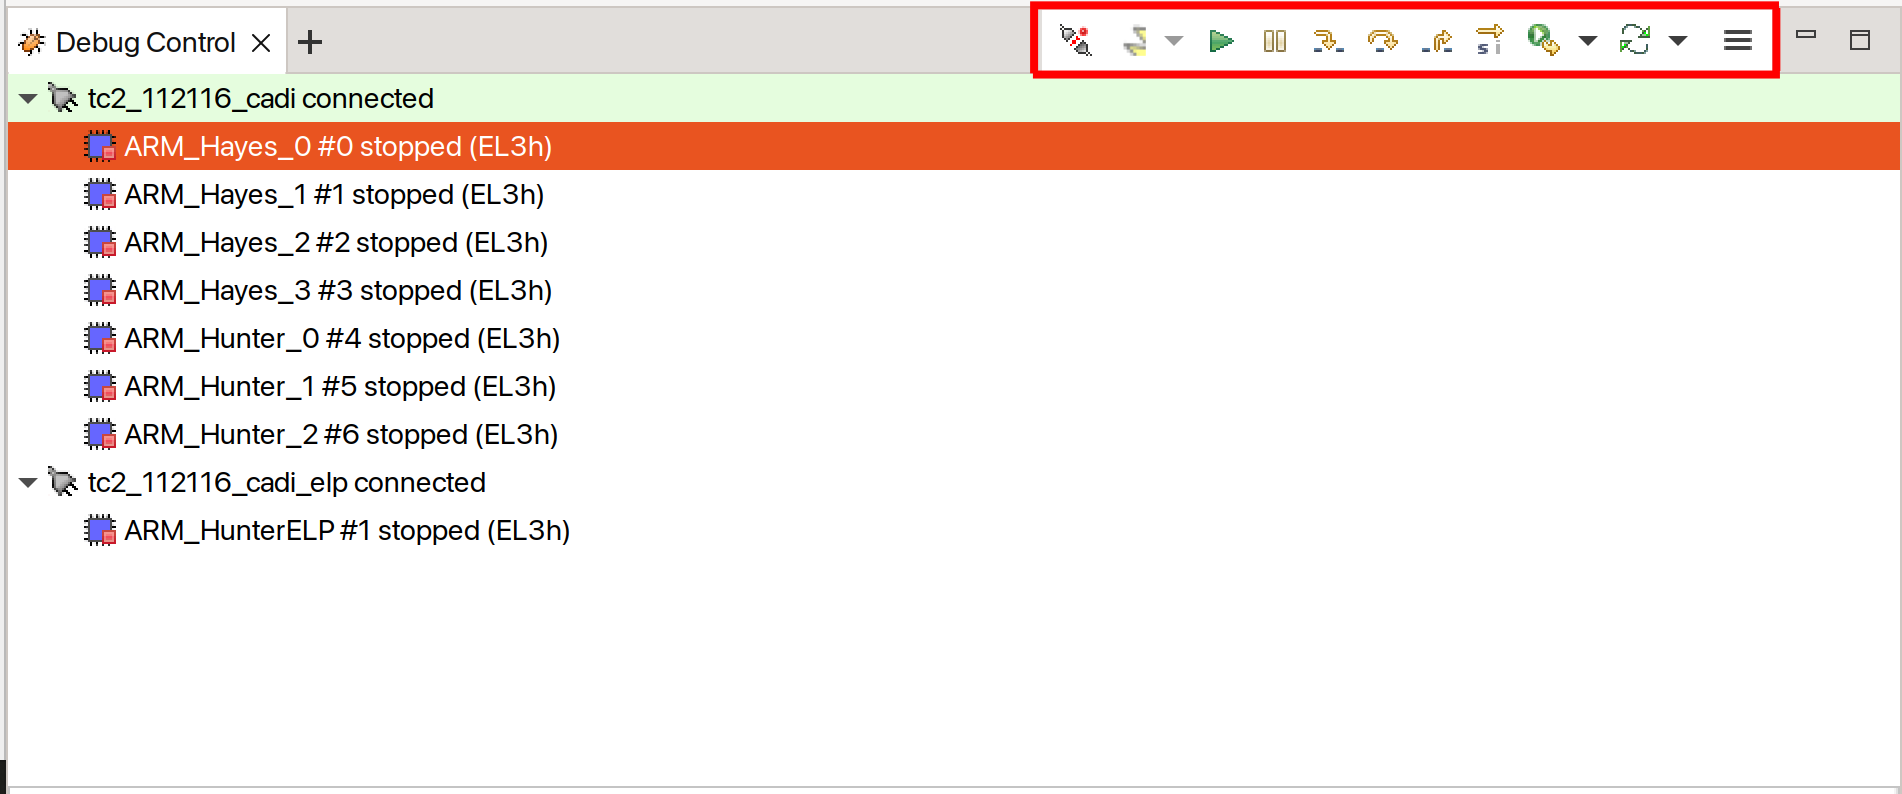
NOTE: There is a known issue in connecting all AP cores together. The Hunter ELP core is missing from the cluster view. As a workaround, you can create two target connections as described in the Creating a new connection section: one for ELP core alone and the other one for the rest of AP cores.
Switch between SCP and AP
Right click on target and select
Debug Configurations;Under
Connection, selectCortex-M3for SCP andArm-Hayes_x/Arm-Hunter_xfor AP core x and then debug.
Enable LLVM parser (for Dwarf5 support)
To enable LLVM parser (with Dwarf5 support), please follow the next steps:
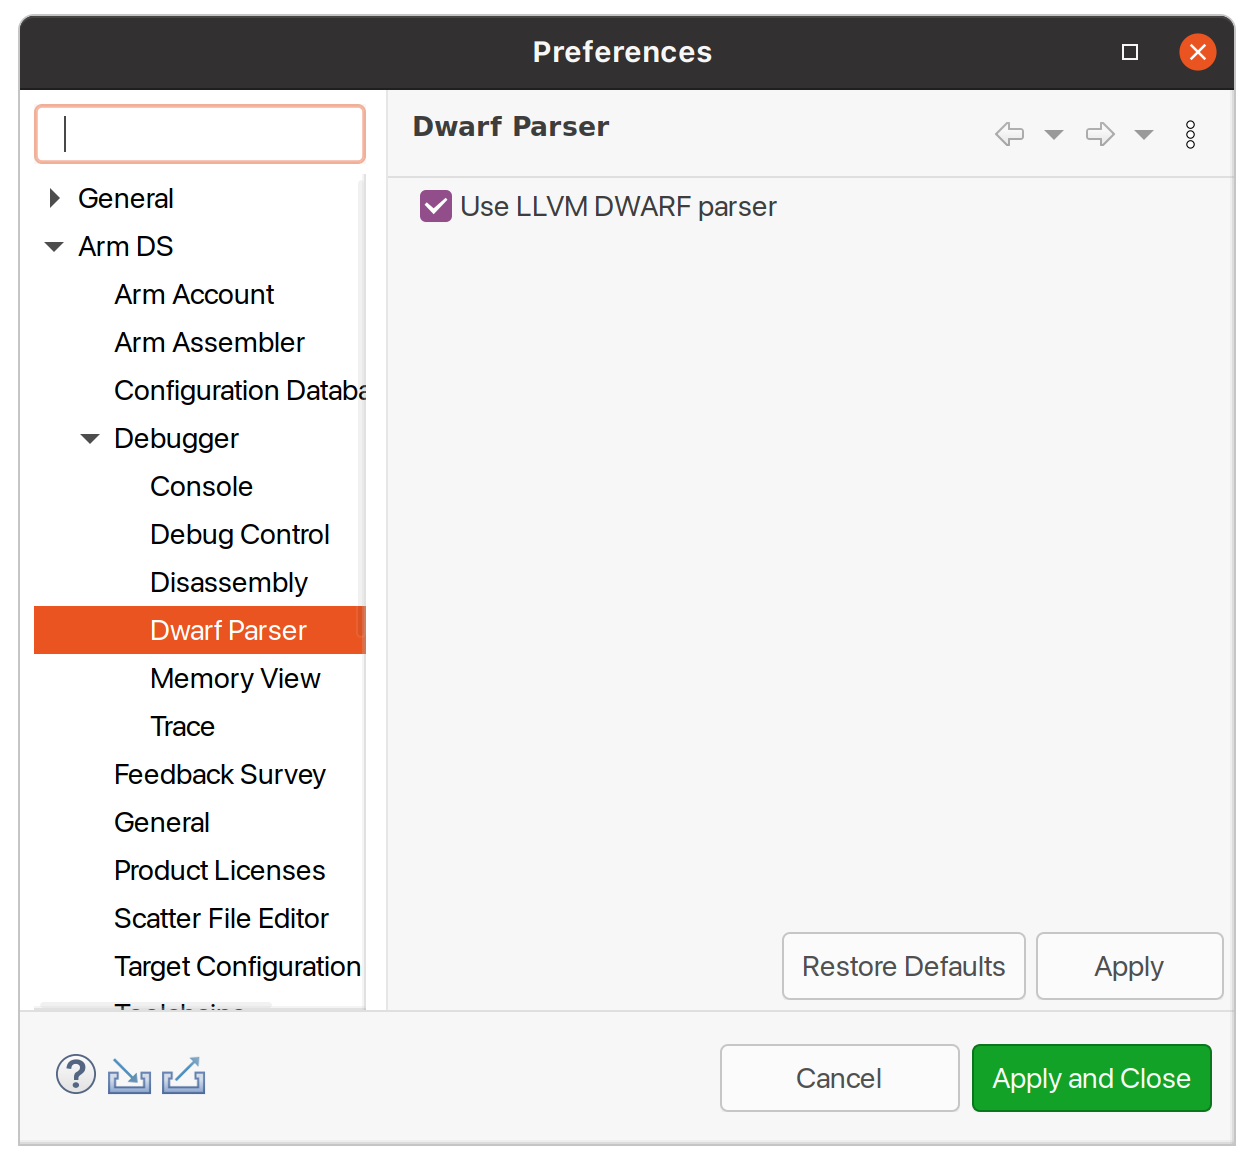
Select
Window->Preferences->Arm DS->Debugger->Dwarf Parser;Tick the
Use LLVM DWARF parseroption;Click the
Apply and Closebutton.
Arm DS version
The previous steps apply to the following Arm DS Platinum version/build:
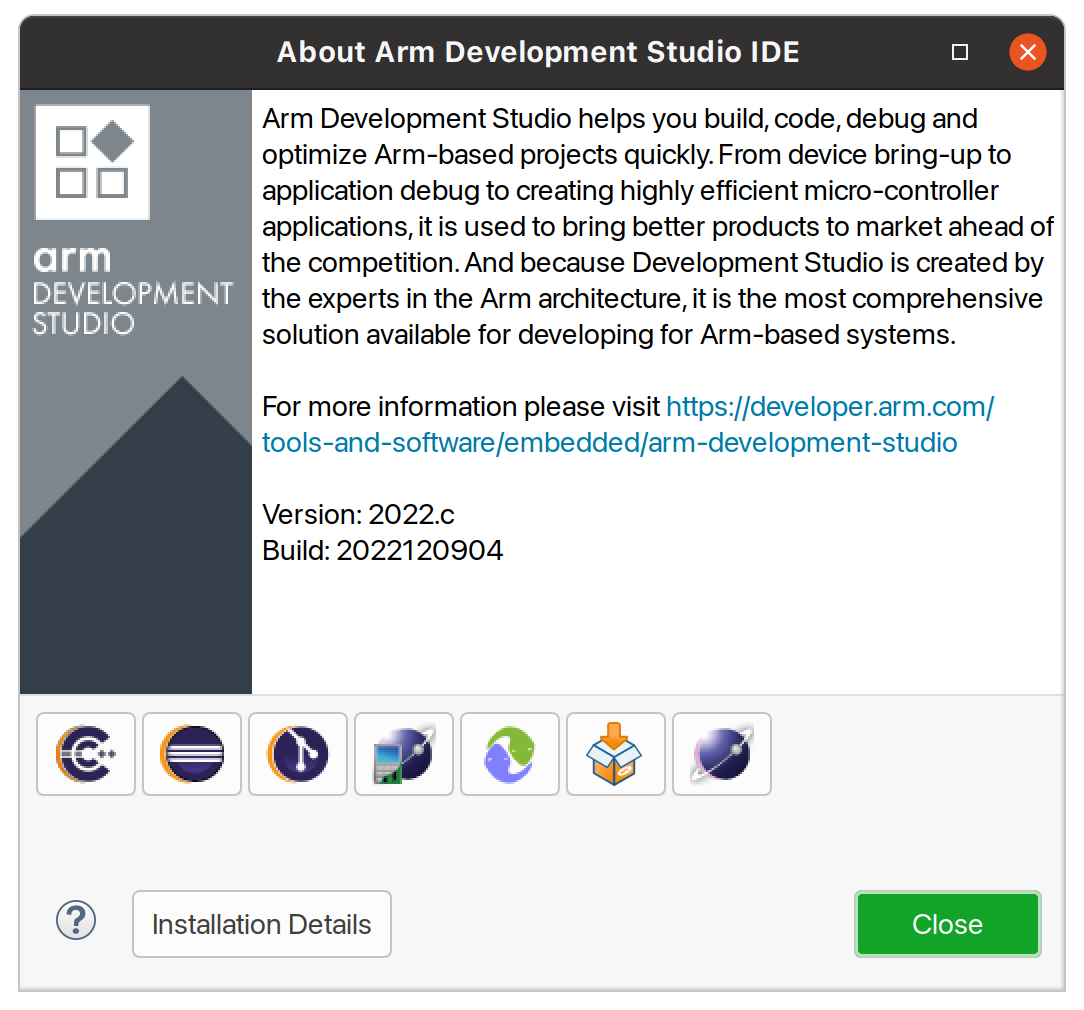
NOTE: Arm DS Platinum is only available to licensee partners. Please contact Arm to have access (support@arm.com).
Firmware Update
Currently, the firmware update functionality is only supported with the buildroot distro.
Creating Capsule
Firmware Update in the total compute platform uses the capsule update mechanism. Hence, the Firmware Image Package (FIP) binary
has to be converted to a capsule. This can be done with GenerateCapsule which is present in BaseTools/BinWrappers/PosixLike
of the edk2 project.
To generate the capsule from the fip binary, run the following command:
./GenerateCapsule -e -o efi_capsule --fw-version 1 --lsv 0 --guid 0d5c011f-0776-5b38-8e81-36fbdf6743e2 --update-image-index 0 --verbose fip-tc.bin
- Command arguments explanation:
fip-tc.binis the input fip file that has the firmware binaries of the total compute platform;efi_capsuleis the name of capsule to be generated;0d5c011f-0776-5b38-8e81-36fbdf6743e2is the image type UUID for the FIP image.
Loading Capsule
The capsule generated using the above steps has to be loaded into memory during the execution of the model by providing the below FVP arguments:
--data board.dram=<location of capsule>/efi_capsule@0x2000000
This will load the capsule to be updated at address 0x82000000.
The final command to run the model for buildroot should look like the following:
./run-scripts/tc2/run_model.sh -m <model binary path> -d buildroot -e "--data board.dram=<location of capsule>/efi_capsule@0x2000000"
Updating Firmware
During the normal boot of the platform, stop at the U-Boot prompt and execute the following command:
TOTAL_COMPUTE# efidebug capsule update -v 0x82000000
This will update the firmware. After it is completed, reboot the platform using the FVP GUI.
Copyright (c) 2022-2023, Arm Limited. All rights reserved.