User Guide
Contents
Notice
The Lumex software stack uses bash scripts to build a Board Support Package (BSP) and a choice of three possible distributions including Buildroot, Debian or Android.
Prerequisites
- These instructions assume that:
Your host PC is running Ubuntu Linux 20.04 or 22.04;
You are running the provided scripts in a
bashshell environment;This release requires Lumex FVP version 11.29.51.
To get the latest repo tool from Google, please run the following commands:
mkdir -p ~/bin
curl https://storage.googleapis.com/git-repo-downloads/repo > ~/bin/repo
chmod a+x ~/bin/repo
export PATH=~/bin:$PATH
- To build and run Android, the minimum requirements for the host machine can be found at https://source.android.com/setup/build/requirements. These include:
at least 250 GB of free disk space to check out the code and an extra 150 GB to build it. If you conduct multiple builds, you need additional space;
at least 64 GB of RAM. Lower amounts may lead to build failures due to out-of-memory (OOM).
To avoid errors while attempting to clone/fetch the different Lumex software components, your system should have a proper minimum git config configuration. The following command exemplifies the typical git config configuration required:
git config --global user.name "<user name>"
git config --global user.email "<email>"
git config --global protocol.version 2
To install and allow access to docker, please run the following commands:
sudo apt install docker.io
# ensure docker service is properly started and running
sudo systemctl restart docker
To manage Docker as a non-root user, please run the following commands:
sudo usermod -aG docker $USER
newgrp docker
Download the source code and build
- The Lumex-1 software stack supports the following distros:
Buildroot (a minimal distro containing Busybox);
Debian (based on Debian 12 Bookworm);
Android (based on Android 15).
Download the source code
To download Buildroot or Debian source code, please define the following environment variable:
export REPO_TARGET=bsp
To download Android source code (a superset of bsp), please define the following environment variable:
export REPO_TARGET=android
Independently of the distribution to be built, create a new folder that will be your workspace (which will henceforth be referred to as <TC_WORKSPACE> in these instructions) and start the cloning code process by running the following commands:
mkdir <TC_WORKSPACE>
cd <TC_WORKSPACE>
export TC_BRANCH=refs/tags/Lumex-1
repo init -u https://gitlab.arm.com/arm-reference-solutions/arm-reference-solutions-manifest \
            -m tc4_a15.xml \
            -b ${TC_BRANCH} \
            -g ${REPO_TARGET}
repo sync -j6
- If cloning Android, this is expected to take a very long time. Once this finishes, the current
<TC_WORKSPACE>should have the following structure: build-scripts/: the components build scripts;run-scripts/: scripts to run the FVP;src/: each component’s git repository;tests/: different test suites.
Initial Setup
- The setup includes two parts:
setup a docker image;
setup the environment to build Lumex images.
Setting up a docker image involves pulling the prebuilt docker image from a docker registry. If that fails, it will build a local docker image.
To setup a docker image, patch the components, install the toolchains and build tools, please run the commands mentioned in the following Build variants configuration section, according to the distro and variant of interest.
The various tools will be installed in the <TC_WORKSPACE>/tools/ directory.
Build options
Debian OS build variant
Currently, the Debian OS build distro does not support software or hardware rendering. Considering this limitation, this build variant should be only used for development or validation work that does not imply pixel rendering.
Android OS build variants
Note
Android based stack takes considerable time to build, so start the build and go grab a cup of coffee!
Hardware vs Software rendering
The Android OS based build distro supports the following variants regarding the use of the GPU rendering:
TC_GPU value |
Description |
|---|---|
swr |
Android display with Swiftshader (software rendering) |
hwr-prebuilt |
Mali GPU (hardware rendering based on prebuilt binaries) |
Android Verified Boot (AVB) with/without authentication
The Android images can be built with or without authentication enabled using Android Verified Boot (AVB) through the use of the -a option.
AVB build is done in userdebug mode and takes a longer time to boot as the images are verified.
This option does not influence the way the system boots, rather it adds an optional sanity check on the prerequisite images.
Build variants configuration
This section provides a quick guide on how to build the different Lumex build variants using the most common options.
Buildroot build
To setup the environment to build the Buildroot distro, please run the following commands:
export PLATFORM=tc4
export FILESYSTEM=buildroot
export TC_TARGET_FLAVOR=fvp
cd build-scripts
./setup.sh
Debian build
Currently, the Debian build does not support software or hardware rendering. As such, the TC_GPU variable value should not be defined. The Debian build can still be a valuable resource when just considering other types of development or validation work, which do not involve pixel rendering.
Debian build (without software or GPU hardware rendering support)
To setup the environment to build the Debian distro, please run the following commands:
export PLATFORM=tc4
export FILESYSTEM=debian
export TC_TARGET_FLAVOR=fvp
cd build-scripts
./setup.sh
Android build
Note
Android SDK, which is required to build the benchmark_model application for Android, has its standalone terms and conditions. These terms and conditions are automatically accepted during Android SDK installation process and can be found in Android Studio Terms and conditions link.
By default, the Android image is built with Android Verified Boot (AVB) disabled. To override this setting and build Android with AVB enabled, please run the next command to enable the corresponding flag in addition to any of the following Android command variants (please note that this needs to be run before running ./setup.sh):
export AVB=true
Android can be built with or without GPU hardware rendering support by setting the TC_GPU environment variable accordingly, as described in the following command usage examples.
Android build with hardware rendering support based on prebuilt binaries
To setup the environment to build the Android distro with hardware rendering based on prebuilt binaries, please run the following commands:
export PLATFORM=tc4
export FILESYSTEM=android
export TC_ANDROID_VERSION=android15
export TC_GPU=hwr-prebuilt
export TC_TARGET_FLAVOR=fvp
cd build-scripts
./setup.sh
Android build with software rendering support
To setup the environment to build the Android distro with software rendering, please run the following commands:
export PLATFORM=tc4
export TC_GPU=swr
export TC_TARGET_FLAVOR=fvp
export FILESYSTEM=android
export TC_ANDROID_VERSION=android15
cd build-scripts
./setup.sh
Warning
If building the Lumex-1 software stack for more than one target, please ensure you run a clean build between each different build to avoid setup/building errors (refer to the next section More about the build system for command usage examples on how to do this).
Warning
If running repo sync again is needed at some point, then the setup.sh script also needs to be run again, as repo sync can discard the patches.
Note
Most builds will be done in parallel using all the available cores by default. To change this number, run export PARALLELISM=<number of cores>
Build command
To build the whole Lumex-1 software stack for any of the supported distros, simply run:
./run_docker.sh ./build-all.sh build
The output directory (henceforth referred to as <TC_OUTPUT>) is <TC_WORKSPACE>/output/<$PLATFORM>/<$FILESYSTEM>/<$TC_TARGET_FLAVOR>/<$TC_GPU>.
For buildroot and debian distros, the <$TC_GPU> option defaults to swr if not defined.
- Once the previous process finishes,
<TC_OUTPUT>will have two subdirectories: tmp_build/storing individual components’ build files;deploy/storing the final images.
More about the build system
The build-all.sh script will build all the components, but each component has its own script, allowing it to be built, cleaned and deployed separately.
All scripts support the clean, build, deploy and patch commands. The build-all.sh script also supports all, which performs a clean followed by a rebuild of all the stack.
For example, to clean, build and deploy SCP, run:
./run_docker.sh ./build-scp.sh clean
./run_docker.sh ./build-scp.sh build
./run_docker.sh ./build-scp.sh deploy
The platform and filesystem used should be defined as described previously, but they can also be specified as the following example:
./run_docker.sh ./build-all.sh \
            -p $PLATFORM \
            -f $FILESYSTEM \
            -a $AVB \
            -t $TC_TARGET_FLAVOR \
            -g $TC_GPU build
Build component requirements
The list of requirements of a specific component can be modified by editing the build_requirements.txt file.
When building a specific component, both the component and the requirements specified after the equal sign will be sequentially rebuilt, considering current environment variables.
To activate this feature, use the with_reqs option appended to the desired component build command, as illustrated in the following example:
./run_docker.sh ./build-scp.sh clean build with_reqs
The with_reqs functionality adheres to the specific details mentioned above for build-all.sh.
Provided components
Firmware Components
Trusted Firmware-A
Based on Trusted Firmware-A
Script |
<TC_WORKSPACE>/build-scripts/build-tfa.sh |
Files |
|
System Control Processor (SCP)
Based on SCP Firmware
Script |
<TC_WORKSPACE>/build-scripts/build-scp.sh |
Files |
|
U-Boot
Based on U-Boot
Script |
<TC_WORKSPACE>/build-scripts/build-u-boot.sh |
Files |
|
Hafnium
Based on Hafnium
Script |
<TC_WORKSPACE>/build-scripts/build-hafnium.sh |
Files |
|
OP-TEE
Based on OP-TEE
Script |
<TC_WORKSPACE>/build-scripts/build-optee-os.sh |
Files |
|
S-EL0 trusted-services
Based on Trusted Services
Script |
<TC_WORKSPACE>/build-scripts/build-trusted-services.sh |
Files |
|
Linux
The component responsible for building a 6.6 version of the Android Common kernel (ACK).
Script |
<TC_WORKSPACE>/build-scripts/build-linux.sh |
Files |
|
Trusty
Based on Trusty
Script |
<TC_WORKSPACE>/build-scripts/build-trusty.sh |
Files |
|
TensorFlow
Based on TensorFlow
Script |
<TC_WORKSPACE>/build-scripts/build-ml-app.sh |
Files |
|
Distributions
Buildroot Linux distro
The layer is based on the Buildroot Linux distribution.
The provided distribution is based on BusyBox and built using glibc.
Script |
<TC_WORKSPACE>/build-scripts/build-buildroot.sh |
Files |
|
Debian Linux distro
Script |
<TC_WORKSPACE>/build-scripts/build-debian.sh |
Files |
|
Android
Script |
<TC_WORKSPACE>/build-scripts/build-android.sh |
Files |
|
Run scripts
Within the <TC_WORKSPACE>/run-scripts/ there are several convenience functions for testing the software
stack. Usage descriptions for the various scripts are provided in the following sections.
Obtaining the Lumex FVP
The Lumex FVP is available for partners to build and run on Linux host environments.
To download the latest available Lumex FVP model, please visit the Arm Lumex CSS FVPs Downloads Page webpage or contact Arm (support@arm.com).
Running the software on FVP
A Fixed Virtual Platform (FVP) of the Lumex platform must be available to run the included run scripts.
The run-scripts structure is as follows:
run-scripts
|--tc4
   |--run_model.sh
   |-- ...
Ensure that all dependencies are met by running the FVP: ./path/to/FVP_RD_Lumex. You should see
the FVP launch, presenting a graphical interface showing information about the current state of the FVP.
The run_model.sh script in <TC_WORKSPACE>/run-scripts/tc4/ will launch the FVP, providing
the previously built images as arguments. The following excerpt contains the command usage help retrieved when running ./run-scripts/tc4/run_model.sh --help script:
$ ./run-scripts/tc4/run_model.sh --help
<path_to_run_model.sh> [OPTIONS]
REQUIRED OPTIONS:
-m, --model MODEL                 path to model
-d, --distro {buildroot|android|debian}
                                  distro version
OPTIONAL OPTIONS
-a, --avb {true|false}            avb boot, DEFAULT: false
-t, --tap-interface               tap interface
-n, --networking {user|tap|none}  networking
                                  DEFAULT: tap if tap interface provided, otherwise user
    --debug {iris|cadi|none}      start a debug server, print the port listening on,
                                  and wait for debugger. DEFAULT: none
-v, --no-visualisation            don't spawn a model visualisation window
    --telnet                      don't spawn console windows, only listen on telnet
-- MODEL_ARGS                     pass all further options directly to the model
Running Buildroot
./run-scripts/tc4/run_model.sh -m <model binary path> -d buildroot
Running Debian
./run-scripts/tc4/run_model.sh -m <model binary path> -d debian
Running Android
Android general common run command
The following command is common to Android builds with AVB disabled, software or any of the hardware rendering variants. To run any of the mentioned Android variants, please run the following command:
./run-scripts/tc4/run_model.sh -m <model binary path> -d android
Android with AVB enabled
To run Android with AVB enabled, please run the following command:
./run-scripts/tc4/run_model.sh -m <model binary path> -d android -a true
Expected behaviour
- When the script is run, four terminal instances will be launched:
terminal_uart_apused by the non-secure world components U-boot, Linux Kernel and filesystem (Buildroot/Debian/Android);terminal_uart1_apused by the secure world components TF-A, Hafnium, Trusty and OP-TEE;terminal_uartused for the SCP logs;rss_terminal_uartused by RSE logs.
Once the FVP is running, the hardware Root of Trust will verify AP and SCP images, initialize various crypto services and then handover execution to the SCP. SCP will bring the AP out of reset. The AP will start booting from its ROM and then proceed to boot Trusted Firmware-A, Hafnium, Secure Partitions (OP-TEE, Trusted Services in Buildroot and Trusty in Android) then U-Boot, and finally the root filesystem of the corresponding distro.
When booting Buildroot or Debian, the model will boot the Linux kernel and present a login prompt on the terminal_uart_ap window. Login
using the username root and the password root (password is only required for Debian). You may need to hit Enter for the prompt to appear.
When booting Android, the GUI window Fast Models - RD Lumex DP0 shows the Android logo and on boot completion,
the window will show the typical Android home screen.
Running sanity tests
This section provides information on some of the suggested sanity tests that can be executed to exercise and validate the Lumex Software stack functionality, as well as information regarding the expected behaviour and test results.
Note
The information presented for any of the sanity tests described in this section should NOT be considered as indicative of hardware performance. These tests and the FVP model are only intended to validate the functional flow and behaviour for each of the features.
SCMI
This test is supported in Buildroot only. When setup the environment to build the Buildroot distro, an extra command is needed:
export SCMI_TESTS=true
before executing the script ./setup.sh. Then build and run the Buildroot distro as normal.
After the FVP is up and running, on the terminal_uart_ap run:
./scmi_test_agent
The test log will be generated with file name arm_scmi_test_log.txt.
The random test failures on test cases 409, 413 and 517 is known issue.
Note
This test is specific to Buildroot only. And the manifest file tc4_a15.xml is used when checkout the code. An example of the expected test result for this test is illustrated in the related Lumex Platform Expected Test Results document section.
TF-A
This test is supported in Buildroot only. After build Buildroot, run commands:
export TFTF_TESTS=true
./run_docker.sh build-tftf-tests.sh all with_reqs
Then run Buildroot as normal. The test results is on terminal_uart_ap.
Note
This test is specific to Buildroot only. An example of the expected test result for this test is illustrated in the related Lumex Platform Expected Test Results document section.
TF-M
After build the selected system distro, run commands:
export RSE_TESTS=true
./run_docker.sh build-rse.sh all with_reqs
Then run the selected system distro as normal. The test results is on terminal_s1.
Note
It is expected that the boot will not complete after the rse tests are run.
Note
An example of the expected test result for this test is illustrated in the related Lumex Platform Expected Test Results document section.
Validate the TensorFlow Lite ML flow
A typical Machine Learning (ML) inference flow can be validated using the TensorFlow Lite’s model benchmarking application.
This application can consume any TensorFlow Lite neural network model file and run a user specified number of inferences on it, allowing to benchmark performance for the whole graph and for individual operators.
More information on the Model Benchmark tool can be found here.
Prerequisites
- For this test, the following files will be required:
benchmark_modelbinary: this file is part of the Lumex build and is automatically built;<any model>.tflitemodel: there is no requirement for a specific model file as long as it is specified in a valid.tfliteformat; for the simplicity of just running a sanity test, two models are provided with the build.armNNfolder: this folder contains the fileslibarmnn.so,libarmnnDelegate.so, andArm_CpuRef_backend.so; these libraries are required by TensorFlow Lite to use ArmNN as one of its backends to delegate work.
For Buildroot and Debian distros, the binaries are automatically integrated into the filesystem (being located at /opt/arm/ml).
For Android distro, the binaries are automatically integrated into the filesystem (being located at /vendor/opt/arm/ml).
If the developer wishes to use their own TensorFlow Lite model, see the following two sections to upload their own model to the running Lumex FVP model.
Manually uploading a TensorFlow Lite ML model for Buildroot or Debian distro
This section describes the steps necessary to manually upload a model to the running Lumex FVP model.
To the purpose of demonstrating this process, an old MobileNet Graph model version will be taken as example (the model can be downloaded from here). To upload and profile the “MobileNet Graph” model, please proceed as described:
start by downloading and decompressing the MobileNet graph model to your local host machine using the following command:
# any host path location can be used (as long it has writable permissions)
mkdir MobileNetGraphTFModel && cd MobileNetGraphTFModel
wget https://storage.googleapis.com/download.tensorflow.org/models/tflite/mobilenet_v1_224_android_quant_2017_11_08.zip
unzip mobilenet_v1_224_android_quant_2017_11_08.zip
upload the MobileNet Graph model to the Lumex FVP model using the following command:
# the following command assumes that the port 8022 is being used as specified in the run_model.sh script
scp -P 8022 mobilenet_quant_v1_224.tflite root@localhost:/opt/arm/ml/
# password (if required): root
once the model has been uploaded to the remote Lumex FVP model, the
benchmark_modelcan be run as described in the nextRunning the provided TensorFlow Lite ML model examplessection.
Manually uploading a TensorFlow Lite ML model for Android
This section describes the steps necessary to manually upload their own TensorFlow Lite model to the Lumex FVP running Android instance, and execute the test.
start by moving to the build folder and upload the MobileNet Graph model by the following commands:
cd <TC_OUTPUT>/deploy/
adb connect localhost:5555
adb push mobilenet_quant_v1_224.tflite /vendor/opt/arm/ml
once the model has been uploaded to the remote Lumex FVP model, the
benchmark_modelcan be run as described in the nextRunning the provided TensorFlow Lite ML model examplessection.
Running the provided TensorFlow Lite ML model examples
The following command describes how to run the benchmark_model application to profile the “Mobile Object Localizer” TensorFlow Lite model, which is one of the provided TensorFlow Lite ML model examples.
Although the command arguments are expected to greatly vary according to different use cases and models, this example provides the typical command usage skeleton for most of the models.
To run the benchmark_model to profile the “Mobile Object Localizer” model, please follow the following steps:
using
terminal_uart_ap, login to the device/FVP model running Lumex and run the following commands:# the following command ensures correct path location to load the provided example ML models # For Buildroot and Debian distro cd /opt/arm/ml # For Android cd /vendor/opt/arm/ml # With XNNPack for CPU path ./benchmark_model --graph=mobile_object_localizer_v1.tflite \ --num_threads=4 --num_runs=1 --min_secs=0.01 --use_xnnpack=true # With ArmNN for GPU path (Only available for Android and Debian) LD_LIBRARY_PATH=/vendor/lib64/egl:armNN/ \ ./benchmark_model \ --graph=mobile_object_localizer_v1.tflite \ --num_threads=4 \ --num_runs=1 \ --min_secs=0.01 \ --external_delegate_path="armNN/libarmnnDelegate.so" \ --external_delegate_options="backends:GpuAcc;logging-severity:info"
The benchmark model application will run profiling the Mobile Object Localizer model and after a few seconds, some statistics and execution info will be presented on the terminal.
System Monitoring Control Framework (SMCF)
Important
This feature might not be applicable to all Lumex Platforms. Please check individual Platform pages, section Supported Features to confirm if this feature is listed as supported.
Glossary
- CME
Cortex Matrix Engine. CMEs are hardware elements that provide support for matrix operations.
- AMU
AMUs are hardware elements to monitor system events – especially power and performance. Monitored events are tracked by AMU registers called counters.
- Monitor
Data source, e.g. AMU activity monitors.
- MLI
Monitor Local Interface. Hardware element that controls a single sensor or monitor.
- MGI
Monitor Group Interface. Hardware element that groups multiple MLIs. Provides a simplified view of sensors and monitors to the software. MGIs have a standard set of registers that can be accessed by the software to control sensors and monitors.
- SMCF
System Monitoring Control Framework. Hardware framework that manages multiple and different sensors and monitors. MLIs and MGIs are defined in the SMCF specifications.
The System Monitoring Control Framework is designed to manage a large and diverse set of on-chip sensors and monitors. It does this by presenting software with a standard interface to control the monitors, regardless of type, and reducing software load of controlling the monitor sampling and data collection.
The SMCF reduces the burden on monitor control by enabling sampling on multiple monitors to be controlled together and by various triggers either internal or external to the SMCF. The number of monitors that the SMCF supports can be configured. The SMCF eases data collection requirements by allowing the data from multiple monitors to be collated in a single location or writing out data to a memory-mapped location that is easier for the monitoring agent to access.
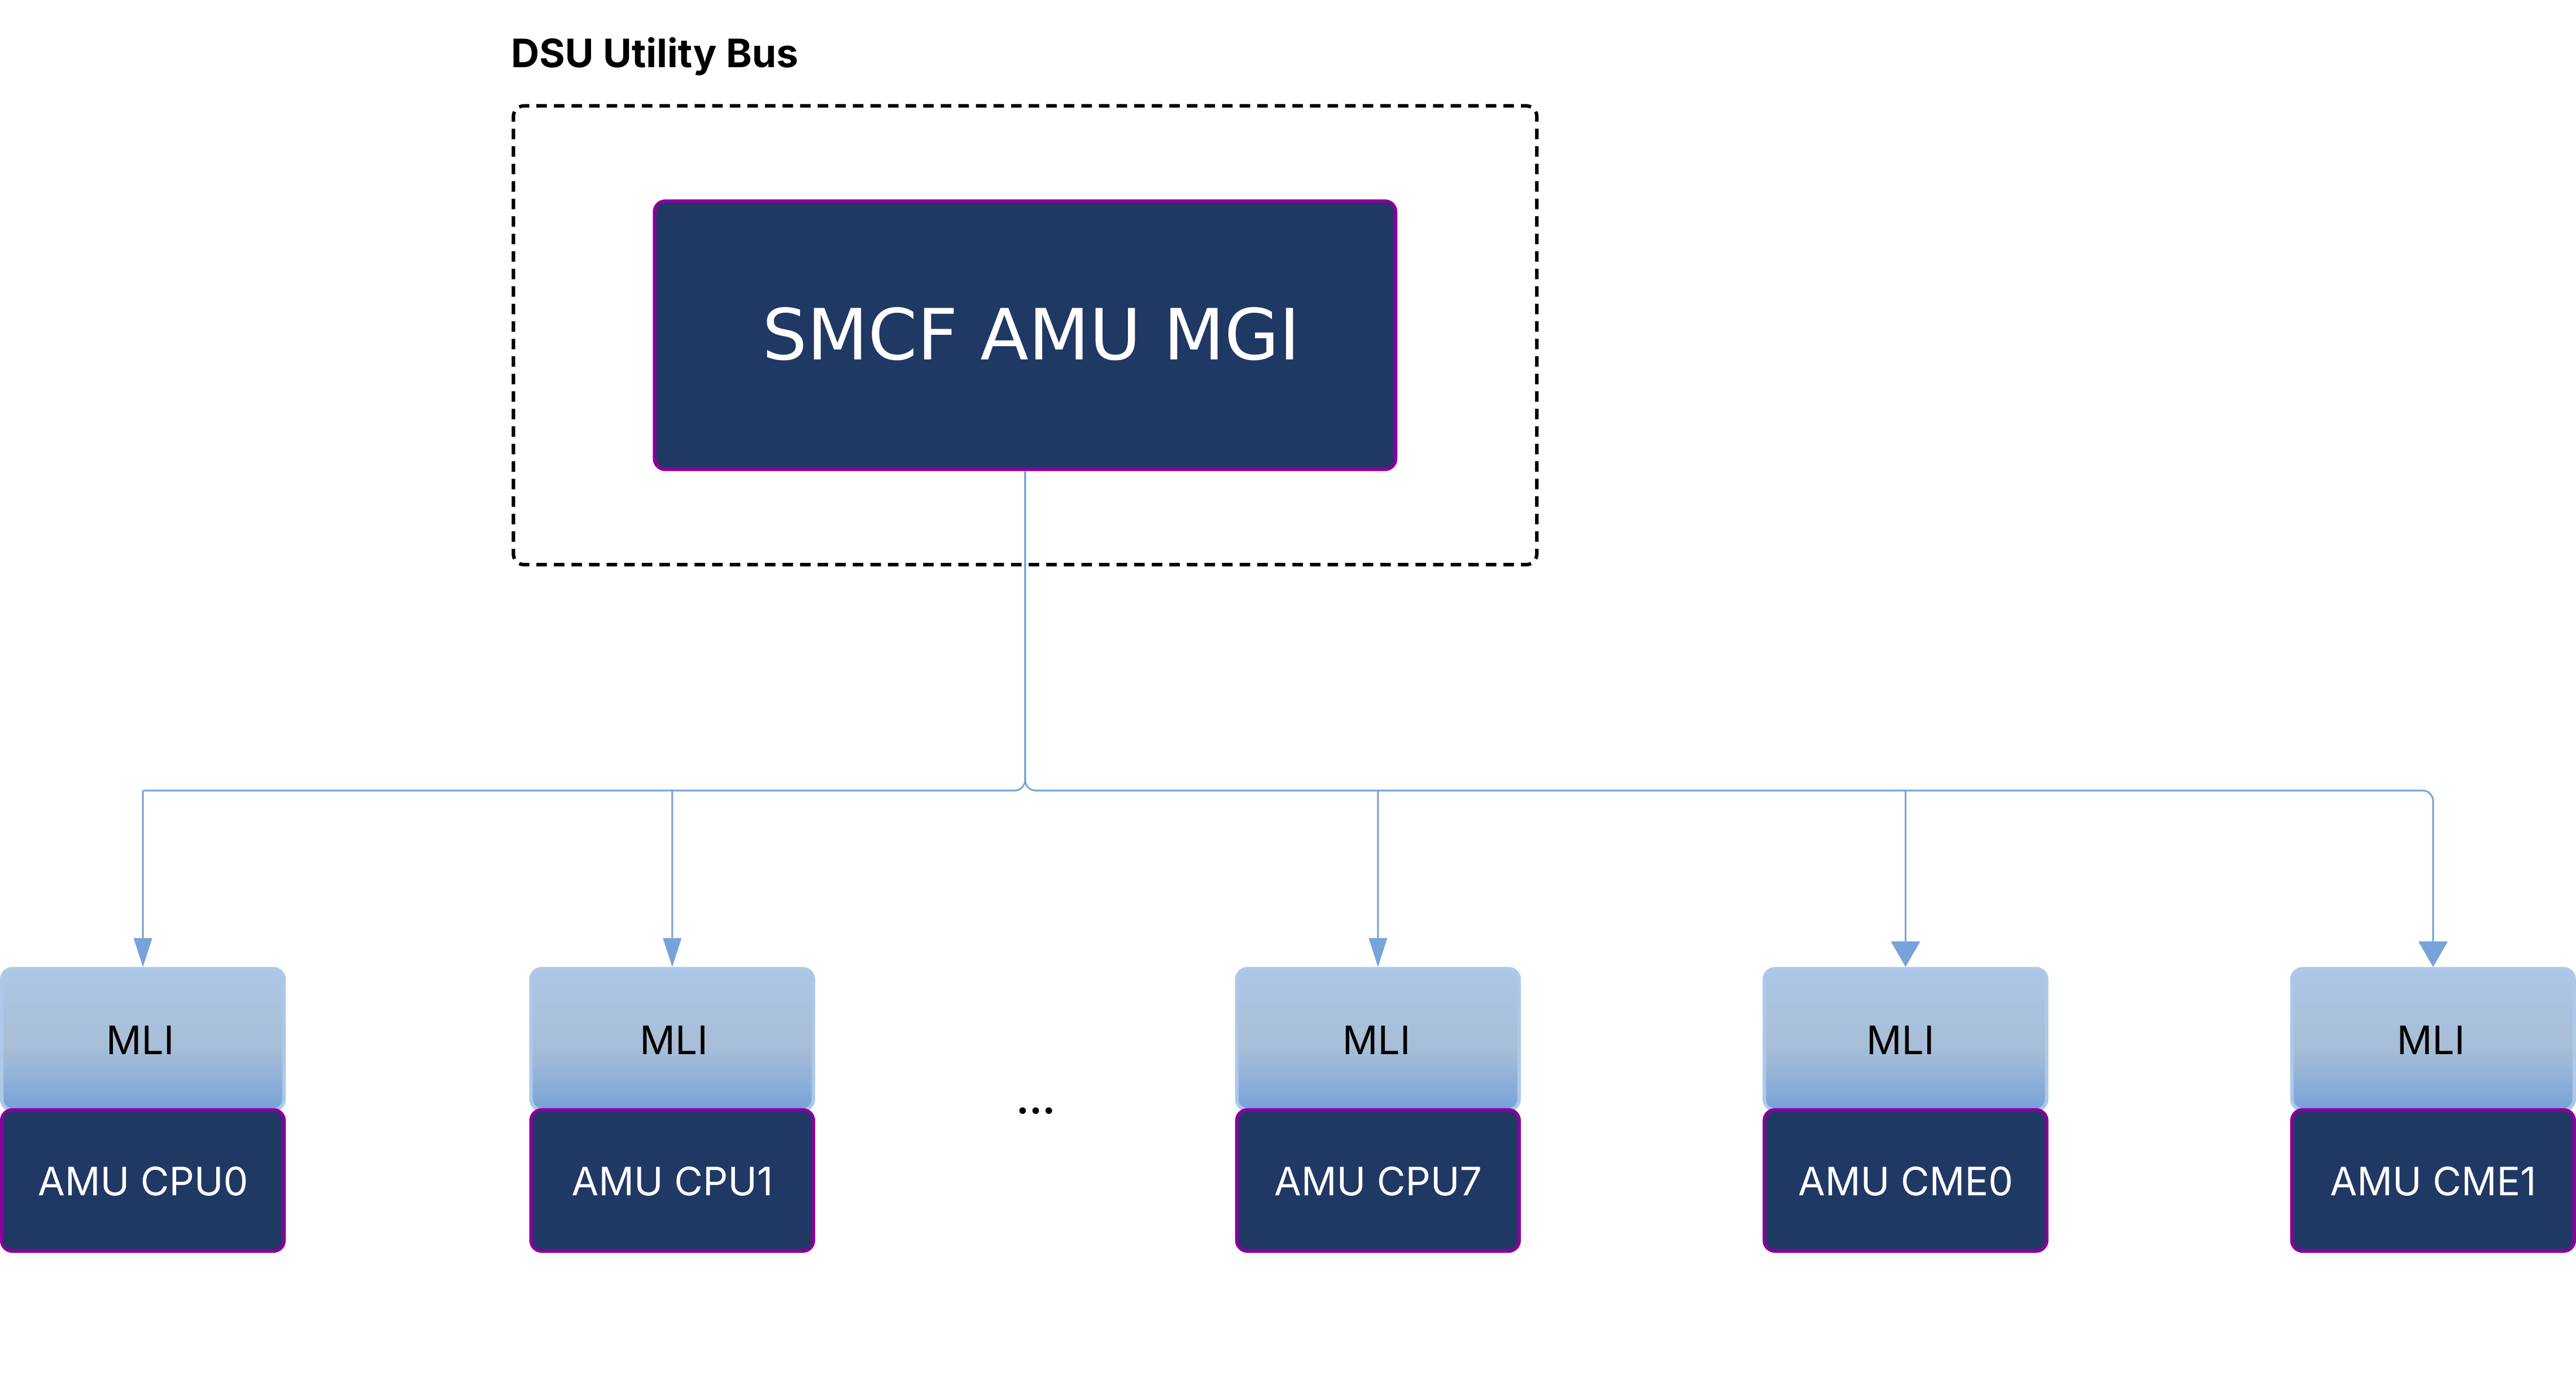
SMCF can effectively manage sensors, track activity counters, and monitor dynamically evolving system data. The SMCF consists of two components, an MGI and an MLI. Each data source is called a monitor and connects to an MLI (Monitor Local Interface).The data width of each monitor could be anything from one bit to 64bits. Each group of MLI’s is connected to one MGI (Monitor Group Interface),which provides the software interface and a set of functions to be applied to a group of monitors. In Lumex, the MLIs for CME AMUs and CPU AMUs are grouped under one MGI which is implemented in the DSU Utility Bus. The diagram below shows the SMCF internal view:
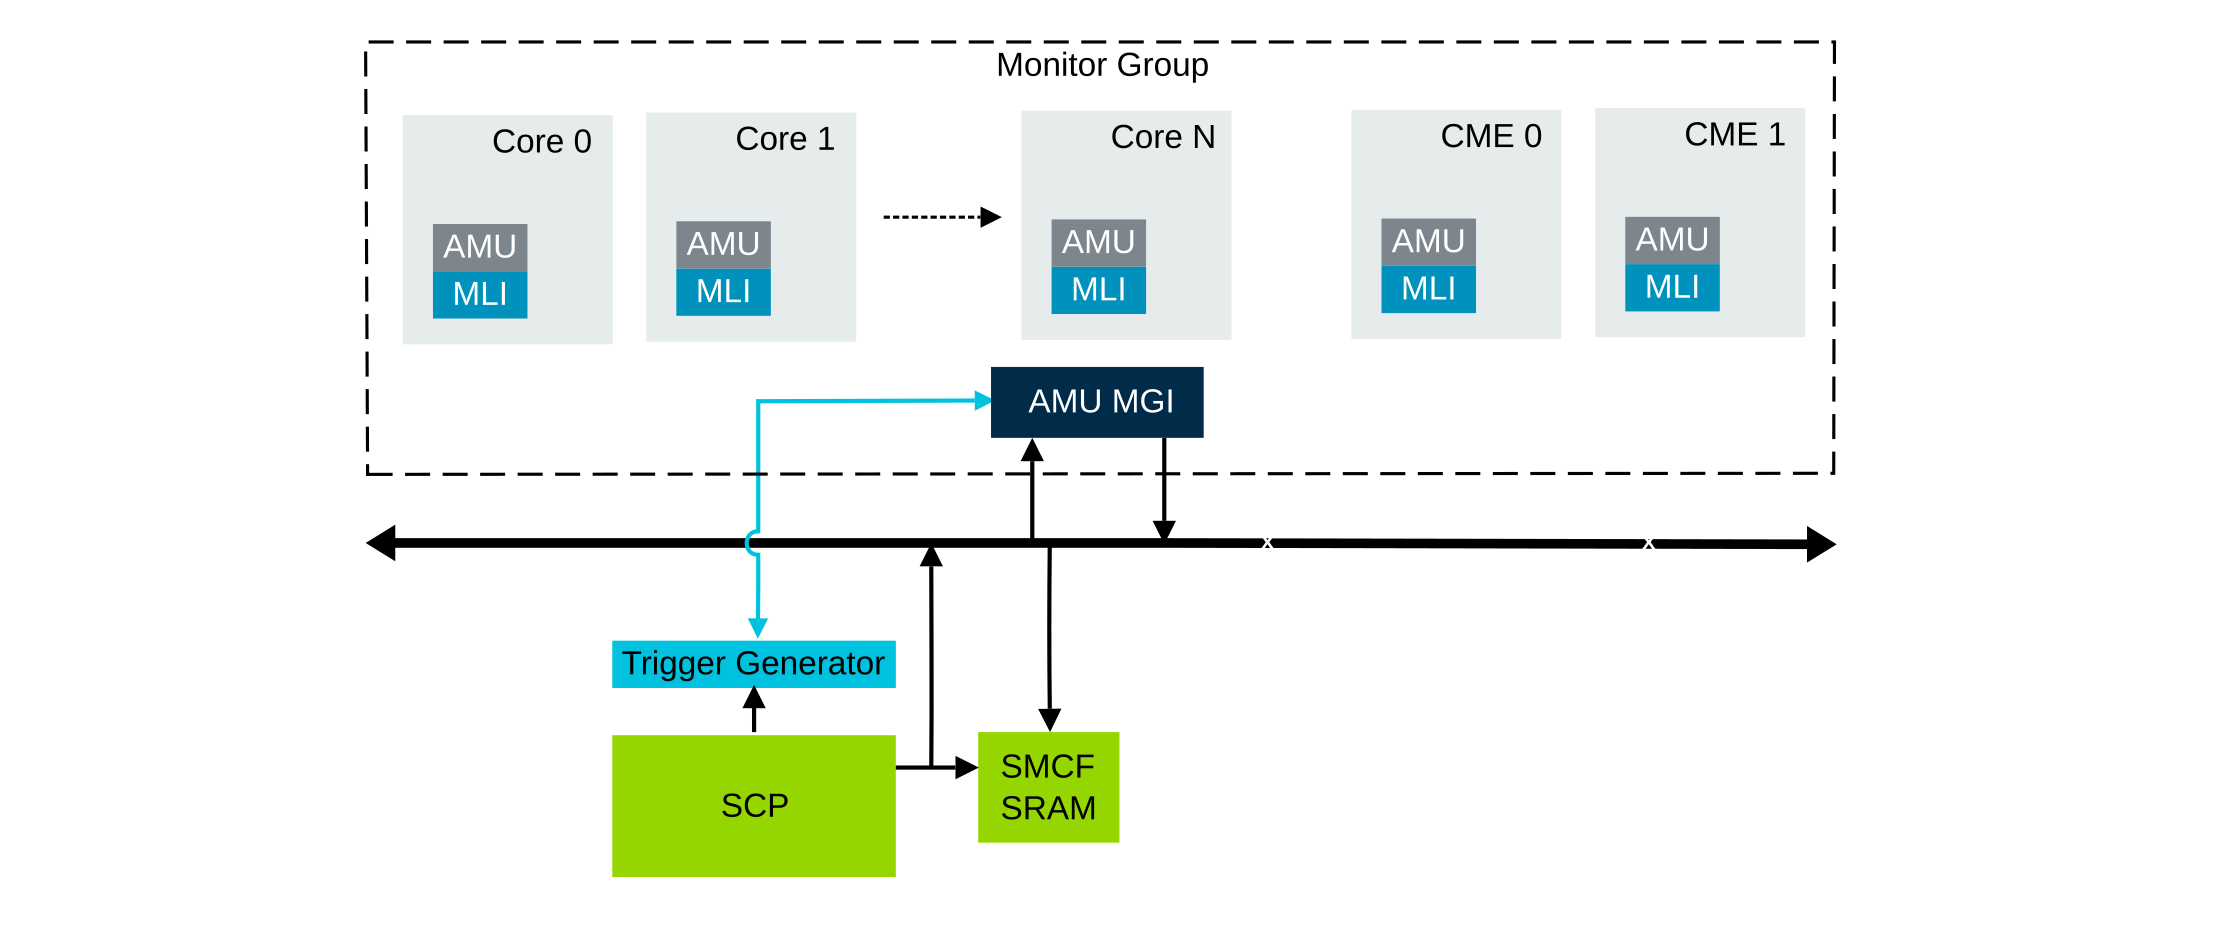
There is a trigger input from the SCP, this is used to trigger a sample on the SMCF MGI. This allows the SCP to trigger a simultaneous sample on all relevant sensors and monitors. The diagram below gives the simplified SoC structure of SMCF:
There are four modes to sampling the data:
Manual Trigger : Initiated by the software for a single sample from the SMCF.
Periodic Sample: Software-driven continuous sampling at predefined interval.
Data Read: Data read sampling is used when a sample is required to be started when the data from the previous monitor sample data set is consumed. When the last data value from a monitor sample data set is read, a new sample begins.
Input Trigger: External event initiated sampling. Input trigger sampling is used when a sample is required to be started from an event that is external to an MGI.
Note
These modes of sampling can be configured via the register MGI_SMP_CFG.SMP_TYP
in the MGI. In Lumex, we use Input Trigger Sampling for CME AMUs.
SMCF Software Flow and Configuration
SCP accesses the SMCF Region through cluster utility mmap, which is mapped to the SCP address translation window.
The MGI then writes 1 to the Input Sampling trigger
MGI_SMP_EN.ENto start the sampling process.Software configures the MGI register base address,sample type, MGI write address,SMCF SRAM read address and respective IRQs.
Software is expected to write to this SMCF MGI Trigger enable register on a regular interval of time to initiate the sensor data collection. The trigger output from this register is expected to go to all MGIs.
The SMCF framework collect the data from MGI and update the SMCF SRAM on receiving the trigger. Software reads the sensor data from the SMCF SRAM.
Any platform with SMCF uses the SMCF to read out the AMU data instead of directly accessing the AMU data.
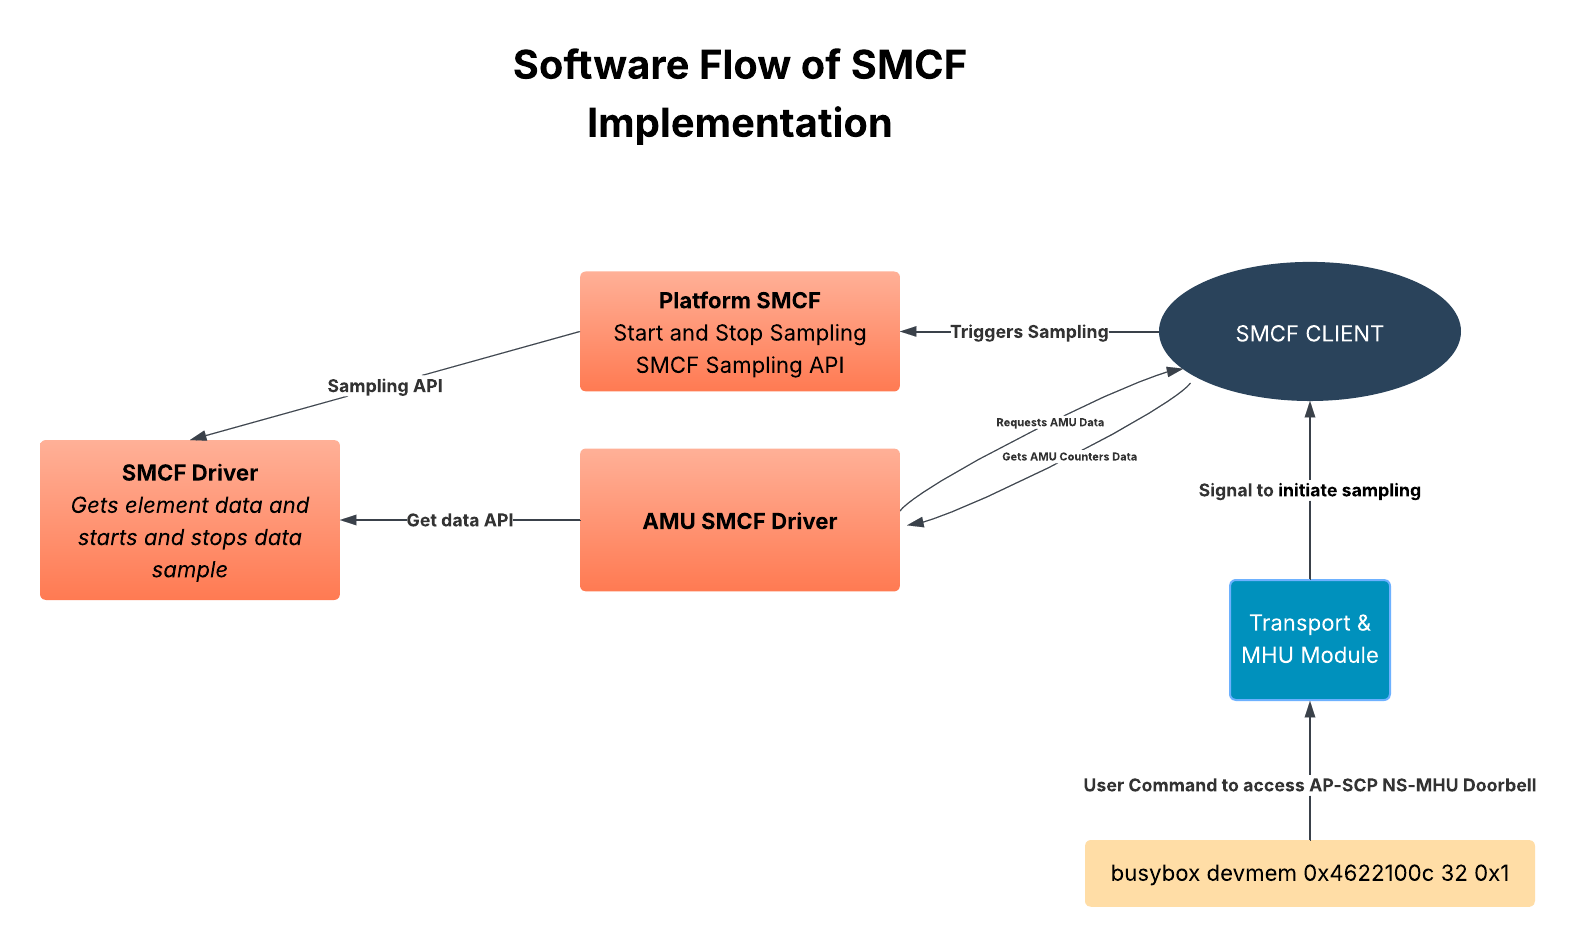
SMCF client module uses AMU smcf and platform smcf module for AMU data collection and for using the data sampling APIs.
The platform smcf module exposes platform specific data sampling APIs i.e start and stop sampling.
SMCF client module in SCP binds to AMU SMCF module to read out the AMU data.
SMCF client, on receiving instructions from the user, triggers the sampling and gives out AMU data as output in the console.
SMCF client is controlled by AP-SCP Non-secure MHU channel. SMCF client binds to Transport module for receiving MHU signal. User from AP Linux console rings AP-SCP Non-secure MHU channel doorbell. On receiving MHU interrupt MHU module through Transport module will signal SMCF client module to start, capture and stop SMCF sampling.
The diagram below explains the software flow of SMCF:
Validating the SMCF
Prerequisites
Some parameters needs to be passed to the FVP via
./run_model.sh <model_params>in order to enable dummy AMU Counters. The following is the parameters needed:-C css.smcf_wrapper.m_dsu_smcf_cluster_CPU_AMU.END_COMPONENT=2
The dummy AMUs generate samples of random numbers. To specify the range of numbers it picks from apply the following:
-C css.smcf_wrapper.m_dsu_smcf_cluster_CPU_AMU.FAKE_SENSOR_MIN_LIMIT=<min_limit> \
-C css.smcf_wrapper.m_dsu_smcf_cluster_CPU_AMU.FAKE_SENSOR_MAX_LIMIT=<max_limit>
Have a currently running Lumex Buildroot FVP instance. For further instructions on this, see the User Guide.
/Dev/mem is not exposed by default in Buildroot. Expose it in Lumex-1 by setting the following build flag in build-scripts/files/kernel/base.cfg:
CONFIG_DEVMEM=y
From the user end, start the SMCF sampling by following procedure:
Executing devmem command from Linux console for accessing AP-SCP NS-MHU doorbell channel.
busybox devmem 0x4622100c 32 0x1
Expected output for the sampling is shown below. Lumex-1 AMUs have 16 counters per AMU, 32 bits wide each counter. The CMEs in Lumex-1 are reprensented under
MLI[9]andMLI[10]respectively.[ 154.797813] [SMCF_CLIENT] Data successfully fetched for MGI[0] MLI[9] [ 154.797835] [SMCF_CLIENT] MGI[0], MLI[9], MGI_DATA[144] = 0x000d [ 154.797856] [SMCF_CLIENT] MGI[0], MLI[9], MGI_DATA[145] = 0x000b [ 154.797878] [SMCF_CLIENT] MGI[0], MLI[9], MGI_DATA[146] = 0x000f [ 154.797900] [SMCF_CLIENT] MGI[0], MLI[9], MGI_DATA[147] = 0x000a [ 154.797923] [SMCF_CLIENT] MGI[0], MLI[9], MGI_DATA[148] = 0x000f [ 154.797945] [SMCF_CLIENT] MGI[0], MLI[9], MGI_DATA[149] = 0x000d [ 154.797966] [SMCF_CLIENT] MGI[0], MLI[9], MGI_DATA[150] = 0x000b [ 154.797989] [SMCF_CLIENT] MGI[0], MLI[9], MGI_DATA[151] = 0x000c [ 154.798010] [SMCF_CLIENT] MGI[0], MLI[9], MGI_DATA[152] = 0x000f [ 154.798032] [SMCF_CLIENT] MGI[0], MLI[9], MGI_DATA[153] = 0x000f [ 154.798055] [SMCF_CLIENT] MGI[0], MLI[9], MGI_DATA[154] = 0x000d [ 154.798077] [SMCF_CLIENT] MGI[0], MLI[9], MGI_DATA[155] = 0x000b [ 154.798098] [SMCF_CLIENT] MGI[0], MLI[9], MGI_DATA[156] = 0x000b [ 154.798120] [SMCF_CLIENT] MGI[0], MLI[9], MGI_DATA[157] = 0x000a [ 154.798142] [SMCF_CLIENT] MGI[0], MLI[9], MGI_DATA[158] = 0x000d [ 154.798164] [SMCF_CLIENT] MGI[0], MLI[9], MGI_DATA[159] = 0x000e [ 154.798188] [SMCF_CLIENT] Data successfully fetched for MGI[0] MLI[10] [ 154.798210] [SMCF_CLIENT] MGI[0], MLI[10], MGI_DATA[160] = 0x000d [ 154.798231] [SMCF_CLIENT] MGI[0], MLI[10], MGI_DATA[161] = 0x000d [ 154.798254] [SMCF_CLIENT] MGI[0], MLI[10], MGI_DATA[162] = 0x000a [ 154.798277] [SMCF_CLIENT] MGI[0], MLI[10], MGI_DATA[163] = 0x000b [ 154.798299] [SMCF_CLIENT] MGI[0], MLI[10], MGI_DATA[164] = 0x000c [ 154.798321] [SMCF_CLIENT] MGI[0], MLI[10], MGI_DATA[165] = 0x000e [ 154.798343] [SMCF_CLIENT] MGI[0], MLI[10], MGI_DATA[166] = 0x000f [ 154.798365] [SMCF_CLIENT] MGI[0], MLI[10], MGI_DATA[167] = 0x000a [ 154.798388] [SMCF_CLIENT] MGI[0], MLI[10], MGI_DATA[168] = 0x000a [ 154.798410] [SMCF_CLIENT] MGI[0], MLI[10], MGI_DATA[169] = 0x000f [ 154.798432] [SMCF_CLIENT] MGI[0], MLI[10], MGI_DATA[170] = 0x000b [ 154.798455] [SMCF_CLIENT] MGI[0], MLI[10], MGI_DATA[171] = 0x000b [ 154.798477] [SMCF_CLIENT] MGI[0], MLI[10], MGI_DATA[172] = 0x000d [ 154.798498] [SMCF_CLIENT] MGI[0], MLI[10], MGI_DATA[173] = 0x000a [ 154.798521] [SMCF_CLIENT] MGI[0], MLI[10], MGI_DATA[174] = 0x000e [ 154.798543] [SMCF_CLIENT] MGI[0], MLI[10], MGI_DATA[175] = 0x000b
OP-TEE
For OP-TEE, the TEE sanity test suite can be run using command xtest on the terminal_uart_ap.
Please be aware that this test suite will take some time to run all its related tests.
Note
This test is specific to Buildroot only. An example of the expected test result for this test is illustrated in the related Lumex Platform Expected Test Results document section.
Trusted Services and Client application
For Trusted Services, please run the command ts-service-test -g FwuServiceTests -g ItsServiceTests -g CryptoKeyDerivationServicePackedcTests -g CryptoMacServicePackedcTests -g CryptoCipherServicePackedcTests -g CryptoHashServicePackedcTests -g CryptoServicePackedcTests -g CryptoServiceProtobufTests -g CryptoServiceLimitTests -v for Service API level tests, and run ts-demo for the demonstration of the client application.
Note
This test is specific to Buildroot only. An example of the expected test result for this test is illustrated in the related Lumex Platform Expected Results document section.
Trusty
On the Android distribution, Trusty provides a Trusted Execution Environment (TEE).
The functionality of Trusty IPC can be tested using the command tipc-test -t ta2ta-ipc with root privilege
(once Android boots to prompt, run su 0 for root access).
Note
This test is specific to Android only. An example of the expected test result for this test is illustrated in the Lumex Platform Expected Test Results document section.
Microdroid
On the Android distribution, Virtualization service provides support to run Microdroid based pVM (Protected VM). In Lumex, it supports running both simple Microdroid demo and real Microdroid instance.
Prerequisites
Boot Lumex FVP with Android distribution to completely up. Leave it for some time (about 30 minutes) after homescreen is rendered for adbd service to work. From one host terminal, run the following commands:
export TC_ANDROID_VERSION=android14
export ANDROID_PRODUCT_OUT=<TC_WORKSPACE>/src/android/out/target/product/tc_fvp/
Note
The document below is for Android 14. android13 can be used to run the test on Android 13. There are different behaviours for Android 13. The differences will be explained end of this chapter.
Run Microdroid demo
On the same host terminal, run command:
./run-scripts/run_microdroid_demo.sh run-tc-app
Note
An example of the expected test result for this test is illustrated in the related Lumex Platform Expected Test Results document section.
Run Microdroid instance
On the same host terminal, run command:
./run-scripts/run_microdroid_demo.sh start-microdroid
The terminal will be pending and waiting for ADB connection to it.
Connect to Microdroid instance with ADB
There are two options using ADB to connect to Microdroid instance.
If there is only one Microdroid instance to be run, connect to it when it starts running. Run the command:
./run-scripts/run_microdroid_demo.sh start-microdroid --auto-connect
If there is more than one Microdroid instance to be run, start the Microdroid instances firstly, then connect to them from another host terminal. Run the command:
./run_microdroid_demo.sh vm-connect <CID>
The CID for the Microdroid instance is shown when the instance starts running.
Also the script will prompt the user to select between the running instances.
Note
This test is specific to Android only. The ADB connection uses the default ADB port 5555. If ADB connect failed, check the ADB port in use and make change to the script manually.
Note
There are two differences for Android 13.
When using the run-tc-app command, the test is not expected to terminate immediately. This allows you to access the shell from another terminal;
To access the VM shell for Microdroid, the build type must be userdebug when building Android. Accessing the VM shell with an eng build (the default build option) is not possible.
To enable userdebug mode, use the command export TC_ANDROID_BUILD_TYPE=userdebug before building Android.
Kernel Selftest
Tests are located at /usr/bin/selftest on the device.
To run all the tests in one go, use ./run_kselftest.sh script. Tests can also be run individually.
./run_kselftest.sh --summary
Warning
KSM driver is not a part of the Lumex-1 kernel. Hence, one of the MTE Kselftests will fail for the check_ksm_options test.
Note
This test is specific to Buildroot only. An example of the expected test result for this test is illustrated in the related Lumex Platform Expected Test Results document section.
Rotational Scheduler
Rotating scheduler is a vendor module in the Linux kernel that will allow to use the CPUs optimally on an asymmetric platform. Typically, on an asymmetric platform, tasks running on big CPUs will finish sooner. The resulting scheduling pattern is not optimal, little/medium CPUs are unused once the big CPUs finish their task, as the tasks running on little/medium CPUs are migrated to big CPU and little/medium CPUs will be in a idle state.
The rotating scheduler:
Starts when one CPU reaches the Rotate state.
Ends when there are no CPU in the Rotate state anymore.
Rotating scheduler will
rotate task between CPUs to have all the tasks finishing approximately at the same time.
no idle time from any CPU.
There are sysfs interface to configure rotating scheduler:
Enable
Enable/disable the rotating scheduler.
Max_latency_us
Keep track of the amount of work each rotating task has achieved. At any time, if the task the most ahead finishes, all the rotating tasks should finish within the next max_latency_us.
Min_residency_us
Tasks are guaranteed a minimum residency time after a rotation. This prevents from having tasks constantly switching on a CPU. Min_residency_us is stronger than max_latency_us, meaning that min_residency_us is strictly respected and max_latency_us is a soft target.
To run the test, on the terminal_uart_ap run:
test_rotational_scheduler.sh
Note
This test is specific to Buildroot only. An example of the expected test result for this test is illustrated in the related Lumex Platform Expected Test Results document section.
MPAM
The hardware and the software requirements required for the MPAM feature can be verified by running the command testing_mpam.sh on terminal_uart_ap (this script is located inside the /bin folder, which is part of the default $PATH environment variable, allowing this command to be executed from any location in the device filesystem).
Note
This test is specific to Buildroot only. An example of the expected test result for this test is illustrated in the related Lumex Platform Expected Test Results document section.
MPMM
- The functionality of the MPMM module in the SCP firmware can be leveraged to:
set the proper gear for each core based on the workload. This functionality can be verified by checking the
INFOlevel SCP logs while executing thevector_workloadtest application on theterminal_uart_apwindow as follows:
vector_workloadenforce the maximum clock frequency for a group of cores of the same type, based on the current gear set for each core in that group. This functionality can be exercised by running the provided shell script
test_mpmm.shwhich will runvector_workloadon the different cores. This test ensures that the maximum clock frequency for a group of cores of the same type does not exceed the values set in Perf Constraint Lookup Table (PCT) of the MPMM module in the SCP firmware.
To run this test, please run the following command in the
terminal_uart_apwindow:test_mpmm.sh tc4 fvp
Note
These tests are specific to Buildroot only. An example of the expected test result for the second test is illustrated in the related Lumex Platform Expected Test Results document section.
BTI
On the terminal_uart_ap run:
su
cd /data/nativetest64/bti-unit-tests/
./bti-unit-tests
Note
This test is specific to Android builds. An example of the expected test result for this test is illustrated in the related Lumex Platform Expected Test Results document section.
MTE
On the terminal_uart_ap run:
su
cd /data/nativetest64/mte-unit-tests/
./mte-unit-tests
Note
This test is specific to Android builds. An example of the expected test result for this test is illustrated in the related Lumex Platform Expected Test Results document section.
PAUTH
On the terminal_uart_ap run:
su
cd /data/nativetest64/pauth-unit-tests/
./pauth-unit-tests
Note
This test is specific to Android builds. An example of the expected test result for this test is illustrated in the related Lumex Platform Expected Test Results document section.
pKVM SMMUv3 driver support validation
The SMMUv3 driver support can be validated by checking the bootlog messages or by running the following presented command. This section describes and educates what output to expect for both situations where the driver is loaded and enabled, or when it fails or is disabled.
On the terminal_uart_ap run:
realpath /sys/bus/platform/devices/3f000000.iommu/driver
When the pKVM driver is loaded and enabled with success, the previous command should report an output similar to the following one:
$ realpath /sys/bus/platform/devices/3f000000.iommu/driver
/sys/bus/platform/drivers/kvm-arm-smmu-v3
If the pKVM driver fails to load or is disabled, the previous command should report an output similar to the following one:
$ realpath /sys/bus/platform/devices/3f000000.iommu/driver
/sys/bus/platform/drivers/arm-smmu-v3
More information about the pKVM driver loading, initialisation phase and it being used by a device driver can be checked during the bootlog messages or by running the command dmesg, which should contain entries similar to the following:
(...)
[    0.033341][    T1] iommu: Default domain type: Translated
[    0.033349][    T1] iommu: DMA domain TLB invalidation policy: strict mode
(...)
[    0.059858][    T1] kvm [1]: IPA Size Limit: 40 bits
[    0.068132][    T1] kvm-arm-smmu-v3 4002a00000.iommu: ias 40-bit, oas 40-bit (features 0x0000dfef)
[    0.068562][    T1] kvm-arm-smmu-v3 4002a00000.iommu: allocated 65536 entries for cmdq
[    0.068574][    T1] kvm-arm-smmu-v3 4002a00000.iommu: 2-level strtab only covers 23/32 bits of SID
[    0.070775][    T1] kvm-arm-smmu-v3 3f000000.iommu: ias 40-bit, oas 40-bit (features 0x0000dfef)
[    0.071061][    T1] kvm-arm-smmu-v3 3f000000.iommu: allocated 65536 entries for cmdq
[    0.071071][    T1] kvm-arm-smmu-v3 3f000000.iommu: 2-level strtab only covers 23/32 bits of SID
[    0.086915][   T69] Freeing initrd memory: 1428K
[    0.094720][    T1] kvm [1]: GICv4 support disabled
[    0.094727][    T1] kvm [1]: GICv3: no GICV resource entry
[    0.094734][    T1] kvm [1]: disabling GICv2 emulation
[    0.094742][    T1] kvm [1]: GIC system register CPU interface enabled
[    0.094803][    T1] kvm [1]: vgic interrupt IRQ18
[    0.095008][    T1] kvm [1]: Protected nVHE mode initialized successfully
(...)
[    0.196354][   T69] komeda 4000000000.display: Adding to iommu group 0
(...)
[    3.792147][   T69] mali 2d000000.gpu: Adding to iommu group 1
(...)
Considering the previous output excerpt, the last line confirms that the system is using pKVM instead of the classic KVM driver.
Note
This test is applicable to all Lumex build distro variants.
CPU hardware capabilities
The Buildroot build variant provides a script that allows to validate the advertisement for the FEAT_AFP, FEAT_ECV and FEAT_WFxT CPU hardware capabilities.
On the terminal_uart_ap run:
test_feats_arch.sh
Note
This test is specific to Buildroot only. An example of the expected test result for this test is illustrated in the related Lumex Platform Expected Test Results document section.
GPU Integration
When Android is built with the Mali DDK (hardware rendering), it supports integration tests for GLES, Vulkan and EGL.
These are built by default as part of the DDK and can be run from the Android command line (aka terminal_uart_ap) once the system has booted.
The following steps and commands are a summarised compilation of the running tests procedure described in that document.
Initial Setup
To prevent potential failures during the start of tests, specify the following environment variables:
On the terminal_uart_ap run:
su
export LD_PRELOAD=/vendor/lib64/egl/libGLES_mali.so
export LD_LIBRARY_PATH=/system/lib64/
cd /data/nativetest64/unrestricted
These tests must be executed from a unrestricted directory, such as within /data/nativetest64/, ensuring the location complies with Android 15’s scoped storage and execution policies
Running GLES integration tests
On the terminal_uart_ap run:
./mali_gles_integration_suite
Note
An example of the expected test result for this test is illustrated in the related Lumex Platform Expected Test Results document section.
Running EGL integration tests
On the terminal_uart_ap run:
./mali_egl_integration_tests
Warning
Please note that, depending on the unitary test selection but especially considering the full EGL test suite, the test execution time may take quite considerable time to run (approx. 2-3 days considering the worst scenario for the full test suite).
Note
An example of the expected test result for this test is illustrated in the related Lumex Platform Expected Test Results document section.
Running Vulkan integration tests
On the terminal_uart_ap run:
./mali_vulkan_integration_suite
Warning
When running the full Vulkan Integration test suite, the test vulkan_wsi_external_memory_dma_buf_32k_image is expected to fail at some point (please refer to the Lumex Platform Expected Test Results for more details). To avoid facing this error or having the GPU Integration test fail, the user is highly suggested to run the tests individually.
Warning
Please note that, depending on the unitary test selection but especially considering the full Vulkan test suite, the test execution time may take quite considerable time to run (approx. 2 weeks considering the worst scenario for the full test suite).
Debugging on Arm Development Studio
This section describes the steps to debug the Lumex software stack using Arm Development Studio.
Attach and Debug
Build the target with debug enabled (the file
<TC_WORKSPACE>/build-scripts/configcan be configured to enable debug);Run the distro as described in the section
Running the software on FVPwith the extra parameters-- -Ito attach to the debugger. The full command should look like the following:./run-scripts/tc4/run_model.sh -m <model binary path> -d <distro> -- -I
Import the model
Add a new model... -> Select Model Interface -> Select Model Connection Method -> Model Running on Local Host. Change the CPU type to A-Generic.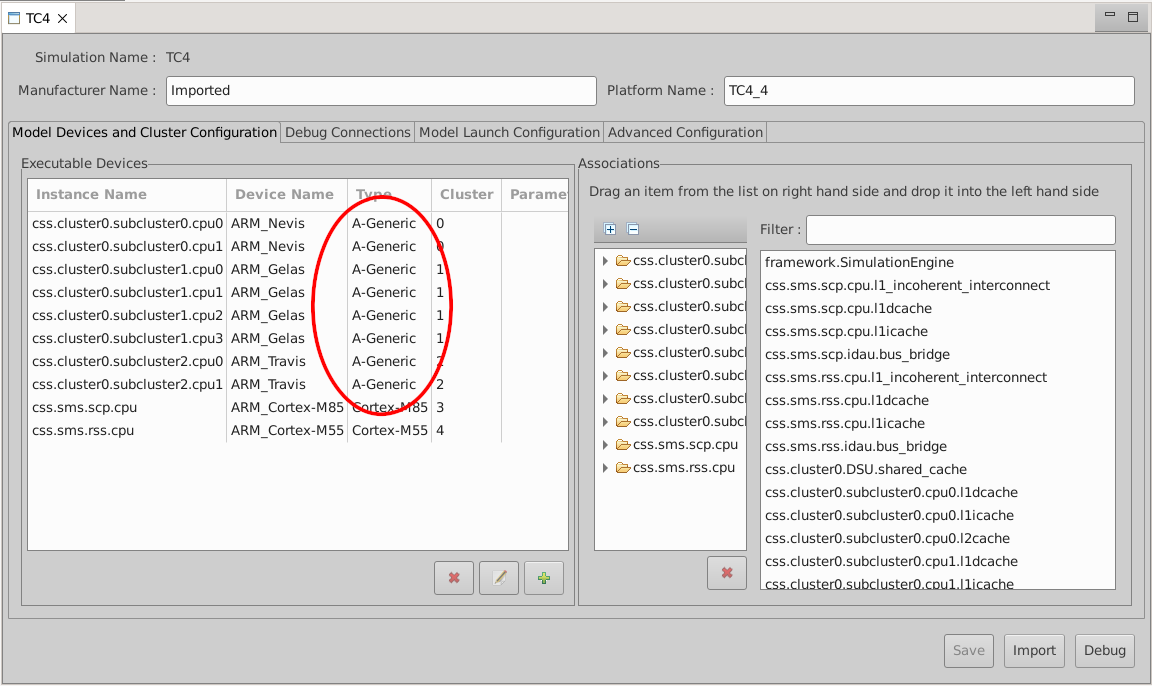
After connection, use options in debug control console (highlighted in the below diagram) or the keyboard shortcuts to
step,runorhalt.To add debug symbols, right click on target ->
Debug configurationsand underfilestab add path toelffiles.Debug options such as
break points,variable watch,memory viewand so on can be used.
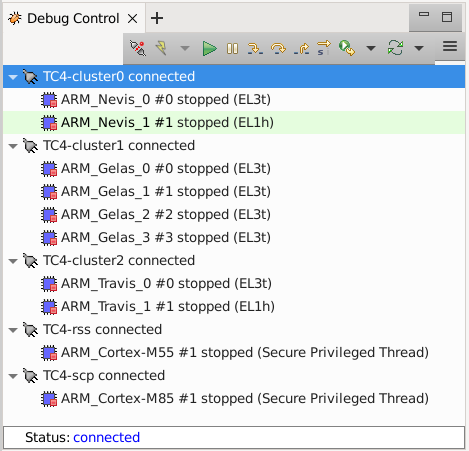
Note
This configuration requires Arm DS version 2023.b or later. The names of the cores shown are based on codenames instead of product names. The mapping for the actual names follows the below described convention:
Codename
Product name
Travis
Cortex A
Gelas
Cortex A
Nevis
Cortex X
Switch between SCP and AP
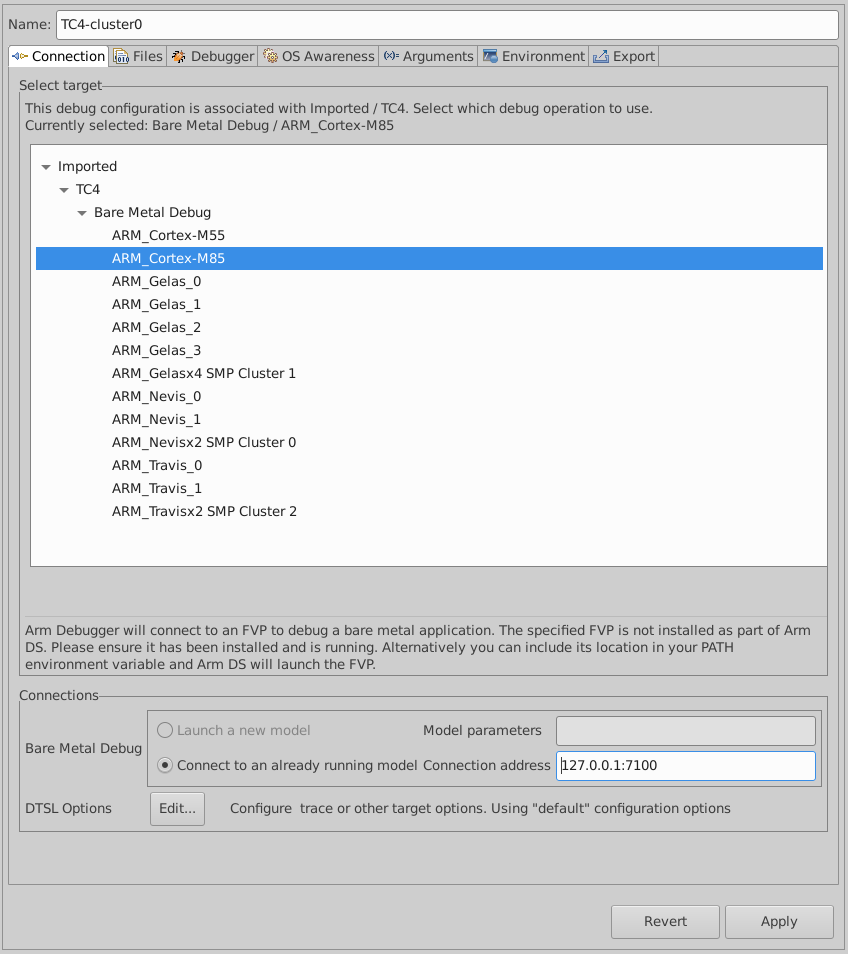
Right click on target and select
Debug Configurations;Under
Connection, selectCortex-M85for SCP or any of the remaining targets to attach to a specific AP (please refer to the previous note regarding the matching between the used codenames and actual product names);Press the
Debugbutton to confirm and start your debug session.
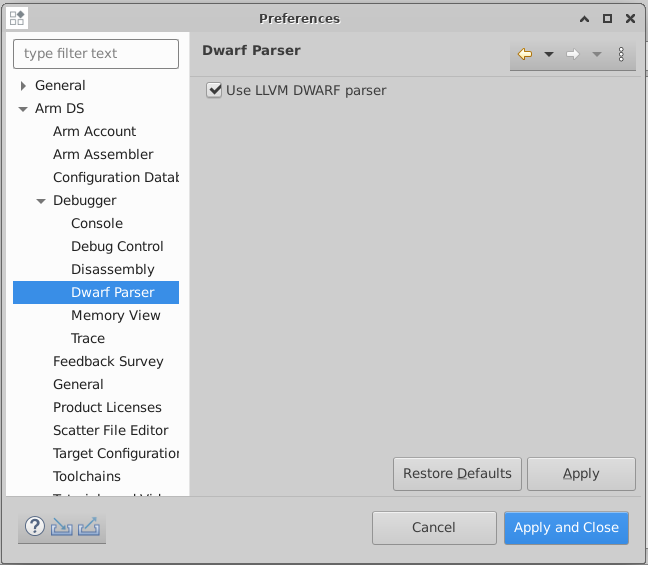
Enable LLVM parser (for Dwarf5 support)
To enable LLVM parser (with Dwarf5 support), please follow the next steps:
Select
Window->Preferences->Arm DS->Debugger->Dwarf Parser;Tick the
Use LLVM DWARF parseroption;Click the
Apply and Closebutton.
Arm DS version
The previous steps apply to the following Arm DS Platinum version/build:
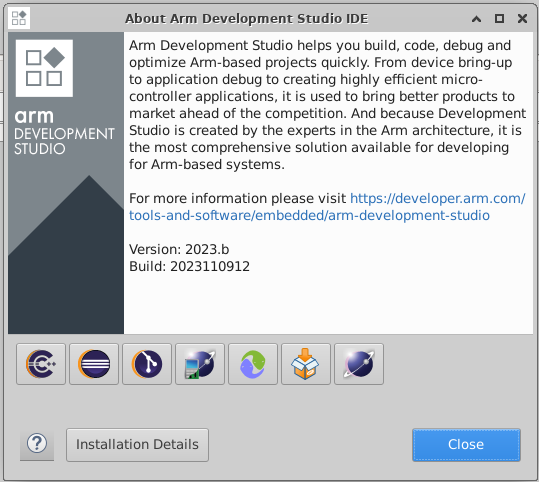
Note
Arm DS Platinum is only available to licensee partners. Please contact Arm to have access (support@arm.com).
Feature Guide
Firmware Update
A secure world Trusted Services app is used to update the firmware from linux userspace.
To perform a firmware update, a Firmware Image Package (FIP) must be provided. A FIP is generated during the build process and is located at <TC_OUTPUT>/deploy.
Steps to upload a FIP to the running model is provided in the next section
Note
The Firmware Update App is specific to Buildroot only.
Obtaining and Uploading a FIP to the running Lumex FVP
It is recommended to rebuild TF-A after booting Lumex to generate a FIP with a different timestamp in order to verify that the Firmware Update App has loaded the new FIP.
Note that the running Lumex FVP should still be running when rebuilding
To build a FIP with a different timestamp, run the following commands after booting Lumex:
cd build-scripts
./run_docker.sh ./build-tfa.sh all with_reqs
Run the following commands to upload the FIP to the running FVP
cd <TC_OUTPUT>/deploy
# the following command assumes that the port 8022 is being used as specified in the run_model.sh script
scp -P 8022 fip-tc.bin root@localhost:/root/
# password (if required): root
Running the Firmware Update App
In terminal_uart_ap, run the following commands:
cd /root
ts-fwu-app-nwd fip-tc.bin

# Expected output
    active: 0, prev active 0
    num of images 1
Verifying that the FIP has been loaded
In terminal_uart1_ap, you can view TF-A logs to see the timestamps the FIP was built.
These logs are located at the very start of terminal_uart1_ap logs. An example of these logs is shown:
NOTICE:  Booting Trusted Firmware
NOTICE:  BL1: v2.12.0(release):v2.9.0-3350-gf54168578
NOTICE:  BL1: Built : 11:22:07, Jul 17 2025
NOTICE:  BL1: Booting BL2
NOTICE:  BL2: v2.12.0(release):v2.9.0-3350-gf54168578
NOTICE:  BL2: Built : 11:22:07, Jul 17 2025
NOTICE:  BL1: Booting BL31
NOTICE:  BL31: v2.12.0(release):v2.9.0-3350-gf54168578
NOTICE:  BL31: Built : 11:22:08, Jul 17 2025
After running the Firmware Update App, run the following command in terminal_uart_ap:
reboot
During reboot, you should see that the TF-A logs indicate a different build timestamp:
NOTICE:  Booting Trusted Firmware
NOTICE:  BL1: v2.12.0(release):v2.9.0-3350-gf54168578
NOTICE:  BL1: Built : 15:30:47, Jul 18 2025
NOTICE:  BL1: Booting BL2
NOTICE:  BL2: v2.12.0(release):v2.9.0-3350-gf54168578
NOTICE:  BL2: Built : 15:30:47, Jul 18 2025
NOTICE:  BL1: Booting BL31
NOTICE:  BL31: v2.12.0(release):v2.9.0-3350-gf54168578
NOTICE:  BL31: Built : 15:30:47, Jul 18 2025
AutoFDO in Android
Feedback Directed Optimization (FDO), also known as Profile Guided Optimization (PGO), uses the profile of a program’s execution to guide the optimizations performed by the compiler.
More information about the AutoFDO process in ARM can be found here.
Prerequisites
To make use of this feature, the following requisites should be observed:
the application must be compiled to include sufficient debug information to map instructions back to source lines. For
clang/llvm, this translates into adding the-fdebug-info-for-profilingand-gline-tables-onlycompiler options;simpleperfwill identify the active program or library using the build identifier stored in the elf file. This requires the use of the following compiler flag-Wl,--build-id=sha1to be added during link time.download Android NDK from Android NDK downloads page and extract its contents.
The following example demonstrates how to compile a sample C program named program.c using clang from Android NDK:
<ndk-path>/toolchains/llvm/prebuilt/linux-x86_64/bin/clang --target=aarch64-linux-android34 --sysroot=<ndk-path>/toolchains/llvm/prebuilt/linux-x86_64/sysroot -fdebug-info-for-profiling -gline-tables-only -Wl,--build-id=sha1 -Wl,--no-rosegment program.c -o program
Steps to use AutoFDO
The following steps describe how to upload the resulting program binary object to the fvp-model, how to generate and convert the execution trace into source level profiles, and how to download and reuse that to optimize the next compiler builds:
connect to the fvp-model running instance;
Please refer to the ADB - Connect to the running FVP-model instance section for more info how to do this.
upload the previous resulting
programbinary object to the remote/datapath location;Please refer to the ADB - Upload a file section for more info how to do this.
using the
terminal_uart_apwindow, navigate into/storage/selfpath location and elevate your privilege level toroot(required and crucial for next steps). This can be achieved by running the following commands on the specified terminal window:cd /storage/self su chmod a+x /data/program
record the execution trace of the program;
The
simpleperfapplication in Android is used to record the execution trace of the application. This trace will be captured by collecting thecs_etmevent fromsimpleperfand will be stored in aperf.datafile.The following command demonstrates how to make use of the
simpleperfapplication to record the execution trace of theprogramapplication (this command is intended to be run on the fvp-model via theterminal_uart_apwindow):simpleperf record -e cs-etm ./program
More info on the
simpleperftool can be found here.convert the execution trace to instruction samples with branch histories;
The execution trace can be converted to an instruction profile using the
simpleperfapplication. The followingsimpleperf injectcommand will decode the execution trace and generate branch histories in text format accepted by AutoFDO (this command is intended to be run on the fvp-model via theterminal_uart_apwindow):simpleperf inject -i perf.data -o inj.data --output autofdo --binary program
convert the instruction samples to source level profiles;
The AutoFDO tool is used to convert the instruction profiles to source profiles for the
GCCandclang/llvmcompilers. It can be installed in the host machine with the following command:sudo apt-get install autofdo
The conversion of the instruction samples to source level profiles requires to pull the instruction profile (generated in the previous step and saved as
inj.datafile), from the model to the host machine using theadbcommand (please refer to the ADB - Download a file section for more info how to do this).The instruction samples produced by
simpleperf injectwill be passed to the AutoFDO tool to generate source level profiles for the compiler. The following line demonstrates the usage command forclang/llvm(this command is intended to be run on the host machine):create_llvm_prof --binary program --profile inj.data --profiler text --out program.llvmprof --format text
use the source level profile with the compiler;
The profile produced by the above steps can now be provided to the compiler to optimize the next build of the
programapplication. Forclang, use the-fprofile-sample-usecompiler option as follows (this command is intended to be run on the host machine):<ndk-path>/toolchains/llvm/prebuilt/linux-x86_64/bin/clang --target=aarch64-linux-android34 --sysroot=<ndk-path>/toolchains/llvm/prebuilt/linux-x86_64/sysroot -O2 -fprofile-sample-use=program.llvmprof -o program program.c
ADB connection on Android
- This section applies to Android distros and describes the steps required to use ADB protocol to perform the following actions (always considering a remote running FVP-model Android instance):
connect to a running fvp-model instance;
upload a file;
download a file;
execute a command via ADB shell.
Connect to the running FVP-model instance
run the fvp-model and wait for the instance to fully boot up (this may take a considerable amount of time depending on the distro under test and the host hardware specification);
once the Android distro boot completes (and the
Fast Models - RD Lumex DP0window shows the complete Android home screen), run the following commands on a new host terminal session to connect to the fvp-model running instance via theadbprotocol:
adb connect 127.0.0.1:5555
adb devices
The following excerpt capture demonstrates the execution and expected output from the previous commands:
# adb connect 127.0.0.1:5555
* daemon not running; starting now at tcp:5037
* daemon started successfully
connected to 127.0.0.1:5555
# adb devices
List of devices attached
127.0.0.1:5555  offline
Note
If the previous command fails to connect, please wait a few more minutes and retry. Due to the indeterministic services boot flow nature, this may circumvent situations where the fvp-model Android instance takes a bit longer to start all the required services and correctly allow communications to happen.
Warning
If running more than one FVP-model on the same host, each instance will get a different ADB port assigned. The assigned ADB port is mentioned during the FVP-model start up phase. Please ensure you are using the correct assigned/mentioned ADB port and adapt the commands mentioned in this entire section as needed (i.e. replacing default port 5555 or <fvp adb port> mentions with the correct port being used).
Upload a file
connect or ensure that an ADB connection to the fvp-model is established;
run the following command to upload a local file to the remote fvp-model Android running instance:
adb -s <fvp adb port> push <local host location for original file> <remote absolute path location to save file>
Note
It may happen that the ADB connection is lost between the connection moment and the moment that the previous command is run. If that happens, please repeat the connection step and the previous command.
Download a file
connect or ensure that an ADB connection to the fvp-model is established;
run the following command to download a remote file to your local host system:
adb -s <fvp adb port> pull <remote absolute path location for original file> <local host location where to save file>
Note
It may happen that the ADB connection is lost between the connection moment and the moment that the previous command is run. If that happens, please repeat the connection step and the previous command.
Execute a remote command
adb -s <fvp adb port> shell <command>
Example:
adb -s <fvp adb port> shell ls -la
There is a script adb_verify.sh under Lumex directory build-scripts/unit_test. It can be used to test all adb commands on Lumex Android.
Note
It may happen that the ADB connection is lost between the connection moment and the moment that the previous command is run. If that happens, please repeat the connection step and the previous command.
Set up TAP interface for Android ADB
This section applies to Android and details the steps required to set up the tap interface on the host for model networking for ADB.
The following method relies on libvirt handling the network bridge. This solution provides a safer approach in which, in cases where a bad configuration is used, the primary network interface should continue operational.
Steps to set up the tap interface
To set up the tap interface, please follow the next steps (unless otherwise mentioned, all commands are intended to be run on the host system):
install
libvirton your development host system:sudo apt-get update && sudo apt-get install libvirt-daemon-system libvirt-clients
The host system should now list a new interface with a name similar to
virbr0and an IP address of192.168.122.1. This can be verified by running the commandifconfig -a(or alternativelyip a sfor newer distributions) which will produce an output similar to the following:$ ifconfig -a virbr0: flags=4099<UP,BROADCAST,MULTICAST> mtu 1500 inet 192.168.122.1 netmask 255.255.255.0 broadcast 192.168.122.255 ether XX:XX:XX:XX:XX:XX txqueuelen 1000 (Ethernet) RX packets 0 bytes 0 (0.0 B) RX errors 0 dropped 0 overruns 0 frame 0 TX packets 0 bytes 0 (0.0 B) TX errors 0 dropped 0 overruns 0 carrier 0 collisions 0 virbr0-nic: flags=4098<BROADCAST,MULTICAST> mtu 1500 ether XX:XX:XX:XX:XX:XX txqueuelen 1000 (Ethernet) RX packets 0 bytes 0 (0.0 B) RX errors 0 dropped 0 overruns 0 frame 0 TX packets 0 bytes 0 (0.0 B) TX errors 0 dropped 0 overruns 0 carrier 0 collisions 0 $
create the
tap0interface:sudo ip tuntap add dev tap0 mode tap user $(whoami) sudo ifconfig tap0 0.0.0.0 promisc up sudo brctl addif virbr0 tap0
download and install the Android SDK from here or, alternatively, install the
adbtool package as follows:sudo apt-get install adb
run the FVP model providing the additional parameter
-t "tap0"to enable the tap interface:./run-scripts/tc4/run_model.sh -m <model binary path> -d android -t "tap0"
Before proceeding, please allow Android FVP model to fully boot and the Android home screen display to be visible on the
Fast Models - RD LumexDP0window.Note
Running and booting the Android FVP model will take considerable time, potentially taking easily 2-3+ hours depending on your host system hardware specification. Please grab a coffee and relax.
once the Android FVP model boots, the Android instance should get an IP address similar to
192.168.122.62, as illustrated in the next figure: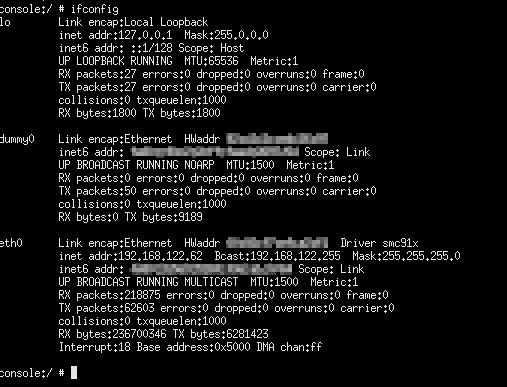
validate the connection between the host
tap0interface and the Android FVP model by running the following command on the fvp-model via theterminal_uart_apwindow:ping 192.168.122.1
Alternatively, it is also possible to validate if the fvp-model can reach a valid internet gateway by pinging, for instance, the IP address
8.8.8.8instead.at this stage, you should also be able to establish an ADB connection with the IP address and upload/download files as described in section ADB connection on Android.
Steps to graceful disable and remove the tap interface
To revert the configuration of your host system (removing the tap0 interface), please follow the next steps:
remove the
tap0from the bridge configuration:sudo brctl delif virbr0 tap0
disable the bridge interface:
sudo ip link set virbr0 down
remove the bridge interface:
sudo brctl delbr virbr0
remove the
libvirtpackage:sudo apt-get remove libvirt-daemon-system libvirt-clients
Running and Collecting FVP tracing information
This section describes how to run the FVP-model, enabling the output of trace information for debug and troubleshooting purposes. To illustrate proper trace output information that can be obtained at different stages, the following command examples will use the SMMU-Yeats block component. However, any of the commands mentioned, can be extended or adapted easily for any other component.
Note
This functionality requires to execute the FVP-model enforcing the additional load of the GenericTrace.so or ListTraceSources.so plugins (which are provided and part of your FVP bundle).
Getting the list of trace sources
To get the list of trace sources available on the FVP-model, please run the following command:
<fvp-model binary path>/FVP_RD_Lumex \
        --plugin <fvp-model plugin path/ListTraceSources.so> \
        >& /tmp/trace-sources-fvp-tc4.txt
This will start the model and use the ListTraceSources.so plugin to dump the list to a file. Please note that the file size can easily extend to tens of megabytes, as the list is quite extensive.
The following excerpt illustrates the output information related with the example component SMMU-Yeats:
Component (1556) providing trace: TC4.css.smmu (MMU_Yeats, 11.25.19)
=============================================================================
Component is of type "MMU_Yeats"
Version is "11.25.19"
#Sources: 294

Source ArchMsg.Error.error (These messages are about activity occurring on the SMMU that is considered an error.
Messages will only come out here if parameter all_error_messages_through_trace is true.

DISPLAY %{output})
        Field output type:MTI_STRING size:0 max_size:120 (The stream output)

Source ArchMsg.Error.fetch_from_memory_type_not_supporting_httu (A descriptor fetch from an HTTU-enabled translation regime to an unsupported
memory type was made.  Whilst the fetch itself may succeed, if an update to
the descriptor was attempted then it would fail.)
Executing the FVP-model with traces enabled
To execute the FVP-model with trace information enabled, please run the following command:
./run-scripts/tc4/run_model.sh -m <model binary path> -d <distro> \
        -- \
        --plugin <fvp-model plugin path/GenericTrace.so> \
        -C 'TRACE.GenericTrace.trace-sources="TC4.cpnss.smmu_rp0_tcu.*,TC4.css.smmu.*"' \
        -C TRACE.GenericTrace.flush=true
Multiple trace sources can be requested by separating the trace-sources strings with commas, as exemplified on the previous command listing.
By default, the trace information will be displayed to the standard output (e.g. display), which due to its verbosity may not be always the ideal solution. For such situations, it is suggested to redirect and capture the trace information into a file, which can be achieved by running the following command:
./run-scripts/tc4/run_model.sh -m <model binary path> -d <distro> \
        -- \
        --plugin <fvp-model plugin path/GenericTrace.so> \
        -C 'TRACE.GenericTrace.trace-sources="TC4.cpnss.smmu_rp0_tcu.*,TC4.css.smmu.*"' \
        -C TRACE.GenericTrace.flush=true \
        >& /tmp/trace-fvp-tc4.txt
Warning
Please note that the trace information output can be very verbose depending on the component and filtering options. This has the potential to produce a large amount of information, which in case of redirecting to a file, can easily achieve file sizes of GB or TB magnitude in a short period of time.
The following output excerpt illustrates an example of the trace information captured for the DPU (streamid=0x00000000) and GPU (streamid=0x00000200):
(...)
cpnss.smmu_rp0_tcu.start_ptw_read: trans_id=0x0000000000000079 streamid=0x00000000 substreamid=0xffffffff ttb_grain_stage_and_level=0x00000202 pa_address=0x000000088ea5bfe0 input_address=0x00000000ff800000 ssd_ns=ssd_ns ns=bus-ns desckind=el2_or_st2_aarch64 inner_cache=rawaWB outer_cache=rawaWB aprot=DNP adomain=ish mpam_pmg_and_partid=0x00000000 ssd=ns pas=ns mecid=0xffffffff
cpnss.smmu_rp0_tcu.verbose_commentary: output="Performing a Table Walk read as:-"
cpnss.smmu_rp0_tcu.verbose_commentary: output="    trans_id:121-st2-final-l2-aa64-ttb0-vmid:0-ns-sid:0"
cpnss.smmu_rp0_tcu.verbose_commentary: output="to ns-0x000000088ea5bfe0-PND-u0x5300000a-m0xffffffff-ish-osh-rawaC-rawaC of size 8B"
cpnss.smmu_rp0_tcu.verbose_commentary: output="Table Walk finished:-"
cpnss.smmu_rp0_tcu.verbose_commentary: output="    trans_id:121-st2-final-l2-aa64-ttb0-vmid:0-ns-sid:0"
cpnss.smmu_rp0_tcu.verbose_commentary: output="got:-"
cpnss.smmu_rp0_tcu.verbose_commentary: output="    0x000000088ea5bfe0: 0x000000088f2006d5"
cpnss.smmu_rp0_tcu.ptw_read: trans_id=0x0000000000000079 streamid=0x00000000 substreamid=0xffffffff ttb_grain_stage_and_level=0x00000202 pa_address=0x000000088ea5bfe0 input_address=0x00000000ff800000 ssd_ns=ssd_ns ns=bus-ns desckind=el2_or_st2_aarch64 inner_cache=rawaWB outer_cache=rawaWB aprot=DNP adomain=ish abort=ok data=0x000000088f2006d5 ssd=ns pas=ns mecid=0xffffffff
cpnss.smmu_rp0_tcu.ptw_read_st2_leaf_descriptor: trans_id=0x0000000000000079 streamid=0x00000000 substreamid=0xffffffff ttb_grain_stage_and_level=0x00000202 pa_address=0x000000088ea5bfe0 input_address=0x00000000ff800000 ssd_ns=ssd_ns ns=bus-ns desckind=el2_or_st2_aarch64 XN=N contiguous=N AF=Y SH10=sh10_osh DBM=N HAP21=hap21_read_write MemAttr3_0=memattr_oNC_iNC output_address=0x000000088f200000 nT=N s2hwu_pbha=0x00 NS=n/a AMEC=MEC not supported. ssd=ns pas=ns mecid=0xffffffff PIE_PIIndex=0xffff PIE_Dirty=n/a POE_POIndex=0xffff AssuredOnly=n/a
(...)
css.smmu.start_ptw_read: trans_id=0x0000000000000040 streamid=0x00000200 substreamid=0xffffffff ttb_grain_stage_and_level=0x00000201 pa_address=0x0000000883794110 input_address=0x00000008899ad000 ssd_ns=ssd_ns ns=bus-ns desckind=el2_or_st2_aarch64 inner_cache=rawaWB outer_cache=rawaWB aprot=DNP adomain=ish mpam_pmg_and_partid=0x00000000 ssd=ns pas=ns mecid=0xffffffff
css.smmu.verbose_commentary: output="Performing a Table Walk read as:-"
css.smmu.verbose_commentary: output="    trans_id:64-st2-final-l1-aa64-ttb0-vmid:1-ns-sid:512"
css.smmu.verbose_commentary: output="to ns-0x0000000883794110-PND-u0x53000109-m0xffffffff-ish-osh-rawaC-rawaC of size 8B"
css.smmu.verbose_commentary: output="Table Walk finished:-"
css.smmu.verbose_commentary: output="    trans_id:64-st2-final-l1-aa64-ttb0-vmid:1-ns-sid:512"
css.smmu.verbose_commentary: output="got:-"
css.smmu.verbose_commentary: output="    0x0000000883794110: 0x00000008899aa003"
css.smmu.ptw_read: trans_id=0x0000000000000040 streamid=0x00000200 substreamid=0xffffffff ttb_grain_stage_and_level=0x00000201 pa_address=0x0000000883794110 input_address=0x00000008899ad000 ssd_ns=ssd_ns ns=bus-ns desckind=el2_or_st2_aarch64 inner_cache=rawaWB outer_cache=rawaWB aprot=DNP adomain=ish abort=ok data=0x00000008899aa003 ssd=ns pas=ns mecid=0xffffffff
css.smmu.ptw_read_st2_table_descriptor: trans_id=0x0000000000000040 streamid=0x00000200 substreamid=0xffffffff ttb_grain_stage_and_level=0x00000201 pa_address=0x0000000883794110 input_address=0x00000008899ad000 ssd_ns=ssd_ns ns=bus-ns desckind=el2_or_st2_aarch64 APTable=aptable_no_effect XNTable=N PXNTable=N TableAddress=0x00000008899aa000 ssd=ns pas=ns mecid=0xffffffff AF=N/A
(...)
DICE/DPE
The Lumex-1 software stack comprises multiple boot components. Enabling Android protected Virtual Machines (pVMs) requires the attestation of each component, starting from low-level firmware up to the OS. Lumex-1 provides this attestation using the Device Identifier Composition Engine (DICE) Layering Scheme to implement a Boot Certificate Chain (BCC). Each software component is measured before it is loaded, and a certificate for each boot stage is created using the measurements of the components in that stage. During the boot stage, the unique secrets associated with each measurement are stored in the DICE Protection Environment (DPE). This is a secure partition in the RSE Runtime Firmware. The resulting BCC is verified when the pVM boots.
Verify DPE from U-boot
To verify DPE is working, run Android distro with AVB (the authentication option) enabled. Refer to the Build variants configuration section for AVB.
It should build and run successfully. And on terminal_uart_ap, there is output:
PVMFW load addr 84000000 size 426 KiB
  Loading PVMFW to f1973000, end f19df5bf ... OK
which shows that PVMFW image is verified and loaded successfully.
Verify DPE from Microdroid
On Android 14 and Android 15, with AVB enabled, the protected VM is supported.
To verify this, run Microdroid with protected option.
Refer to the Microdroid section on how to run Microdroid instance.
Based on that, to use the protected option, run the command:
# for one Microdroid instance
./run-scripts/run_microdroid_demo.sh start-microdroid --protected
The script displays output similar to the following
...
11-25 20:56:54.125 68 68 I vm_payload: vm_payload: Notified host payload
ready successfully
11-25 20:56:54.152 69 69 I adbd : persist.adb.watchdog set to ''
11-25 20:56:54.152 69 69 I adbd : persist.sys.test_harness set to ''
11-25 20:56:54.152 69 69 I adbd : adb watchdog timeout set to 600 seconds
11-25 20:56:54.152 69 69 I adbd : Setup mdns on port= 5555
11-25 20:56:54.152 69 72 I adbd : Waiting for
persist.adb.tls_server.enable=1
11-25 20:56:54.153 69 69 I adbd : adbd listening on vsock:5555
11-25 20:56:54.153 69 69 I adbd : adbd started
...
In a new terminal, with the correct environment variables exported, connect to the pVM. If only one VM instance is running, you do not need to specify the CID.
./run_microdroid_demo.sh vm-connect <CID>
The terminal displays the Microdroid VM shell prompt, meaning that DPE is working correctly
Verify the Boot Certificate Chain (BCC)
To verify that the BCC generated by the DPE is valid, the BCC verification testsuite can be run.
Build the software stack with debug logging for RSE partitions enabled by
changing updating the following config variable in build-scripts/config/common.config
RSE_PARTITION_LOG_LEVEL="TFM_PARTITION_LOG_LEVEL_DEBUG"
Then build the Android 14 or 15 software stack with AVB enabled, then run the FVP until it fully boots.
Once the FVP has booted, in a separate terminal, navigate to build-scripts/
and run the following command
./run_docker.sh ../run-scripts/verify_bcc.sh \
    --log latest \
    --platform tc4 \
    --filesystem android \
    --flavor fvp \
    --gpu <your $TC_GPU value>
The expected results for the verification test are:
Verify Structure: PASS
Certificate Count           : PASS
Component Count (Cert1)     : PASS
Component Count (Cert2)     : PASS
Component Count (Cert3)     : PASS
Component Count (Cert4)     : PASS


Verify Hashes: PASS
RSE_BL1_2           : PASS
RSE_BL2             : PASS
SCP_BL1             : PASS
RSE_S               : PASS
AP_BL1              : PASS
FW_CONFIG           : PASS
TB_FW_CONFIG        : PASS
AP_BL2              : PASS
AP_BL31             : PASS
HW_CONFIG           : PASS
AP_BL32             : PASS
TOS_FW_CONFIG       : PASS
SP_PKG1             : PASS
AP_BL33             : PASS
NT_FW_CONFIG        : PASS
BOOT                : PASS
PVMFW               : PASS

Verify Issuer Labels: PASS
Cert 1      : PASS
Cert 2      : PASS
Cert 3      : PASS
Cert 4      : PASS
Copyright (c) 2025, Arm Limited. All rights reserved.