User Guide
Contents
Notice
The Large Screen Compute 2023 (LSC23) software stack uses bash scripts to build a Board Support Package (BSP) to boot Debian or to run ACS tests. Please refer to https://developer.arm.com/Architectures/Architectural%20Compliance%20Suite for more info on ACS.
Prerequisites
- These instructions assume that:
Your host PC is running Ubuntu Linux 20.04 or above;
You are running the provided scripts in a
bashshell environment;You have downloaded the TC3 Fixed Virtual Platform (FVP) version 11.26.16;
You have at least 100 GB of free disk space. If you conduct multiple builds, you need additional space;
You have at least 32 GB of RAM;
You have configured ssh keys to access various remotes;
To get the latest repo tool from Google, run the following commands:
mkdir -p ~/bin
curl https://storage.googleapis.com/git-repo-downloads/repo > ~/bin/repo
chmod a+x ~/bin/repo
export PATH=~/bin:$PATH
To avoid errors while attempting to clone/fetch the different TC software components, your system should have a proper minimum git config configuration. The following commands show the typical git config configuration required:
git config --global user.name "<user name>"
git config --global user.email "<email>"
git config --global protocol.version 2
To install and allow access to docker, run the following commands:
sudo apt install docker.io
# ensure docker service is properly started and running
sudo systemctl restart docker
To manage Docker as a non-root user, run the following commands:
sudo usermod -aG docker $USER
newgrp docker
Download the source code and build
- The LSC23 software stack supports the following distros:
Debian official image (based on Debian 12 Bookworm);
ACS image
Download the source code
To download firmware to build and boot Debian, please define the following environment variable:
export REPO_TARGET=bsp
Independently of the distribution to be built, create a new folder for your workspace (referred to as <TC_WORKSPACE> in these instructions) and clone the code by running the following commands:
mkdir <TC_WORKSPACE>
cd <TC_WORKSPACE>
export TC_BRANCH=refs/tags/LSC23.1
repo init -u git@git.gitlab.arm.com:arm-reference-solutions/arm-reference-solutions-manifest.git \
            -m lsc23.xml \
            -b ${TC_BRANCH} \
            -g ${REPO_TARGET}
repo sync -j6
Note
A successful repo sync will end with string repo sync has finished successfully. If the repo sync gets stuck, terminate the process using CTRL+c and run the repo sync again.
- Once this finishes, the current
<TC_WORKSPACE>has the following structure: build-scripts/: the components build scripts;run-scripts/: scripts to run the FVP;src/: each component’s git repository;tests/: different test suites.
Build options
Debian OS build variant
Currently, the Debian OS build distro does not support software or hardware rendering. Considering this limitation, this build variant should be only used for development or validation work that does not imply pixel rendering.
This variant downloads the ACS Test Suite Image during the build. For steps to run acs-test-suite, see Running ACS Test Suite(UEFI boot with ACPI support).
Debian-official build
Initial Setup
- The initial setup includes two steps:
Set up a docker image;
Set up the environment to build TC images.
To setup the environment to build the Official Debian distro and to set up docker Image, please run the following commands. Export the TC_TARGET_FLAVOR variable with either the value fvp or fpga, depending on the target for the TC3 software stack build:
The various tools are installed in the <TC_WORKSPACE>/tools/ directory.
export PLATFORM=tc3
export FILESYSTEM=debian-official
export TC_TARGET_FLAVOR=<fvp or fpga>
export TC_BL33=uefi
cd build-scripts
./setup.sh
Build command
To build the whole TC3 software stack, run the following command. This builds the stack for the LSC23 configuration and TC3 traces:
./run_docker.sh ./build-all.sh build
The output directory (henceforth referred to as <TC_OUTPUT>) is <TC_WORKSPACE>/output/<$PLATFORM>/<$FILESYSTEM>/<$TC_TARGET_FLAVOR>.
- Once the previous process finishes,
<TC_OUTPUT>will have two subdirectories: tmp_build/storing individual components’ build files;deploy/storing the final images.
More about the build system
The build-all.sh script will build all the components, but each component has its own script, allowing it to be built, cleaned and deployed separately.
All scripts support the clean, build, deploy and patch commands. The build-all.sh script also supports all, which performs a clean followed by a rebuild of all the stack.
For example, to clean, build and deploy SCP, run:
./run_docker.sh ./build-scp.sh clean
./run_docker.sh ./build-scp.sh build
./run_docker.sh ./build-scp.sh deploy
The platform and filesystem environment variables were defined previously, but you can also specify the values as parameters on the command line:
./run_docker.sh ./build-all.sh \
            -p $PLATFORM \
            -f $FILESYSTEM \
            -a $AVB \
            -t $TC_TARGET_FLAVOR \
            -g $TC_GPU build
Build component requirements
The list of requirements of a specific component can be modified by editing the build_requirements.txt file.
When building a specific component, both the component and the requirements specified after the equal sign will be sequentially rebuilt, considering current environment variables.
To activate this feature, use the with_reqs option appended to the desired component build command, as illustrated in the following example:
./run_docker.sh ./build-scp.sh clean build with_reqs
The with_reqs functionality adheres to the specific details mentioned above for build-all.sh.
Provided components
Firmware and Software Components
Runtime Security Engine (RSE)
Based on Runtime Security Engine
Script |
<TC_WORKSPACE>/build-scripts/build-rse.sh |
Files |
|
System Control Processor (SCP)
Based on SCP Firmware
Script |
<TC_WORKSPACE>/build-scripts/build-scp.sh |
Files |
|
Trusted Firmware-A
Based on Trusted Firmware-A
Script |
<TC_WORKSPACE>/build-scripts/build-tfa.sh |
Files |
|
UEFI
Based on UEFI
Script |
<TC_WORKSPACE>/build-scripts/build-uefi.sh |
Files |
|
Hafnium
Based on Hafnium
Script |
<TC_WORKSPACE>/build-scripts/build-hafnium.sh |
Files |
|
OP-TEE
Based on OP-TEE
Script |
<TC_WORKSPACE>/build-scripts/build-optee-os.sh |
Files |
|
S-EL0 trusted-services
Based on Trusted Services
Script |
<TC_WORKSPACE>/build-scripts/build-trusted-services.sh |
Files |
|
Run scripts
Within the <TC_WORKSPACE>/run-scripts/ there are several convenience functions for testing the software
stack. Usage descriptions for the various scripts are provided in the following sections.
Obtaining the LSC3 FVP
The LSC23(aka TC3) FVP is publicily available.
To download the latest available TC3 FVP model, please visit https://developer.arm.com/-/cdn-downloads/permalink/FVPs-Total-Compute/Total-Compute-TC3/FVP_TC3_11.26_16_Linux64.tgz webpage or contact Arm (https://support.developer.arm.com/).
Running the software on FVP
A Fixed Virtual Platform (FVP) of the LSC23(TC3) platform must be available to run the included run scripts.
The run-scripts structure is as follows:
run-scripts
|--tc3
   |--run_model.sh
|-- ...
Ensure that all dependencies are met by running the FVP: ./<fvp-model binary path>/FVP_TC3. You should see
the FVP launch, presenting a graphical interface showing information about the current state of the FVP.
The run_model.sh script in <TC_WORKSPACE>/run-scripts/tc3/ will launch the FVP, providing
the previously built images as arguments. The following excerpt contains the command usage help retrieved when running ./run-scripts/tc3/run_model.sh --help script:
$ ./run-scripts/tc3/run_model.sh --help
<path_to_run_model.sh> [OPTIONS]
REQUIRED OPTIONS:
-m, --model MODEL                 path to model
-d, --distro {buildroot|android|debian|debian-official|acs-test-suite}
                                  distro version
OPTIONAL OPTIONS
-a, --avb {true|false}            avb boot, DEFAULT: false
-t, --tap-interface               tap interface
-n, --networking {user|tap|none}  networking
                                  DEFAULT: tap if tap interface provided, otherwise user
    --debug {iris|cadi|none}      start a debug server, print the port listening on,
                                  and wait for debugger. DEFAULT: none
-v, --no-visualisation            don't spawn a model visualisation window
    --telnet                      don't spawn console windows, only listen on telnet
-- MODEL_ARGS                     pass all further options directly to the model
Running Debian-official
./run-scripts/tc3/run_model.sh -m <model binary path> -d debian-official
Expected behaviour
- When the script is run, four terminal instances will be launched:
terminal_uart_apused by the non-secure world components U-boot, Linux Kernel and filesystem (Debian);terminal_uart1_apused by the secure world components TF-A, Hafnium, Trusty and OP-TEE;terminal_s0used for the SCP logs;terminal_s1used by RSE logs.
Once the FVP is running, the hardware Root of Trust will verify AP and SCP images, initialize various crypto services and then handover execution to the SCP. SCP will bring the AP out of reset. The AP will start to boot Trusted Firmware-A, Hafnium, Secure Partitions (OP-TEE, Trusted Services) then EDK2, GRUB, and finally boots to Debian OS.
Running sanity tests
This section provides information on some of the suggested sanity tests that can be executed to exercise and validate the TC Software stack functionality, as well as information regarding the expected behaviour and test results.
Note
The information presented for any of the sanity tests described in this section should NOT be considered as indicative of hardware performance. These tests and the FVP model are only intended to validate the functional flow and behaviour for each of the features.
Running ACS Test Suite(UEFI boot with ACPI support)
To run ACS (UEFI boot with ACPI support), run the below command:
./run-scripts/tc3/run_model.sh -m <model binary path> -d acs-test-suite
To extract the results of ACS Test, do the following:
Mount ACS Image into local machine;
mkdir /mnt/test
sudo mount -o rw,offset=<calculated_offset_value> systemready_acs_live_image.img /mnt/test/
The offset value is calculated by multiplying the start sector of the image by the sector size. In the following example, the start sector it is 2048 and one sector is 512 bytes. In this example, the offset is 2048*512=1048576.
$ fdisk -lu sr_acs_live_image.img
Disk sr_acs_live_image.img: 642 MiB, 673185792 bytes, 1314816 sectors
Units: sectors of 1 * 512 = 512 bytes
Sector size (logical/physical): 512 bytes / 512 bytes
I/O size (minimum/optimal): 512 bytes / 512 bytes
Disklabel type: gpt
Disk identifier: 3AA2160A-2483-42E0-8AB7-4DFBD3E2D5AD

Device                 Start     End Sectors  Size Type
sr_acs_live_image.img1  2048 1312766 1310719  640M Microsoft basic data
- Once the image is mounted. The mount directory has the following structure.
acs_results/: ACS Test resultsEFI/: Startup sripts and ACS Test uefi binariesgrub.cfg: UEFI ConfigurationsImage: Linux Imageramdisk-buildroot.img: Buildroot image. After ACS Test, system will boot to Linuxsecurity-interface-extension-keys: Security keys for BBSR (Base Boot Security Requirements)
Go to the mount directory. ACS results will be under
acs_resultsfolder;cd /mnt/test/acs_results
Note
An example of the expected test result for this sanity test is illustrated in the related Large Screen Compute Platform Expected Test Results document section.
ACPI Test Suite
Verify the ACPI tables in UEFI shell
To verify all the ACPI tables in the UEFI shell, do the following:
Start the TC3 FVP model running Debian and pay close attention to the
FVP terminal_uart_apwindow (as you need to be very quick to succeed on the next step):# following command does assume that current location is <TC3_WORKSPACE> ./run-scripts/tc3/run_model.sh -m <model binary path> -d debian-official
When the Press ESCAPE for boot options … message appears, quickly press
ESCkey to interrupt the initial boot and launch the boot options menu:
Using the navigation keys on your keyboard, select the
Boot Manageroption as illustrated on the next image and press theENTERkey to select it: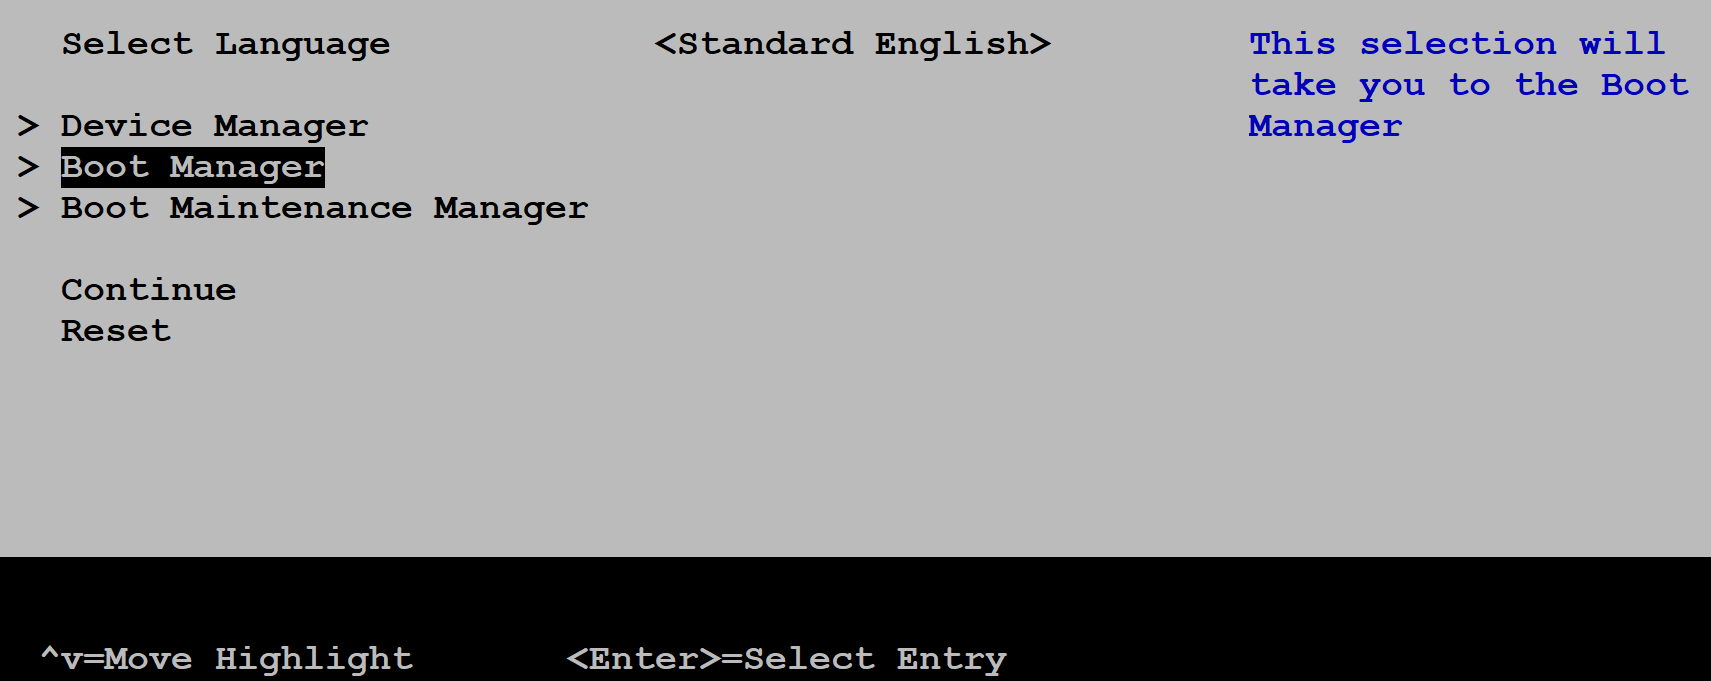
Select the
UEFI Shelloption and press theENTERkey: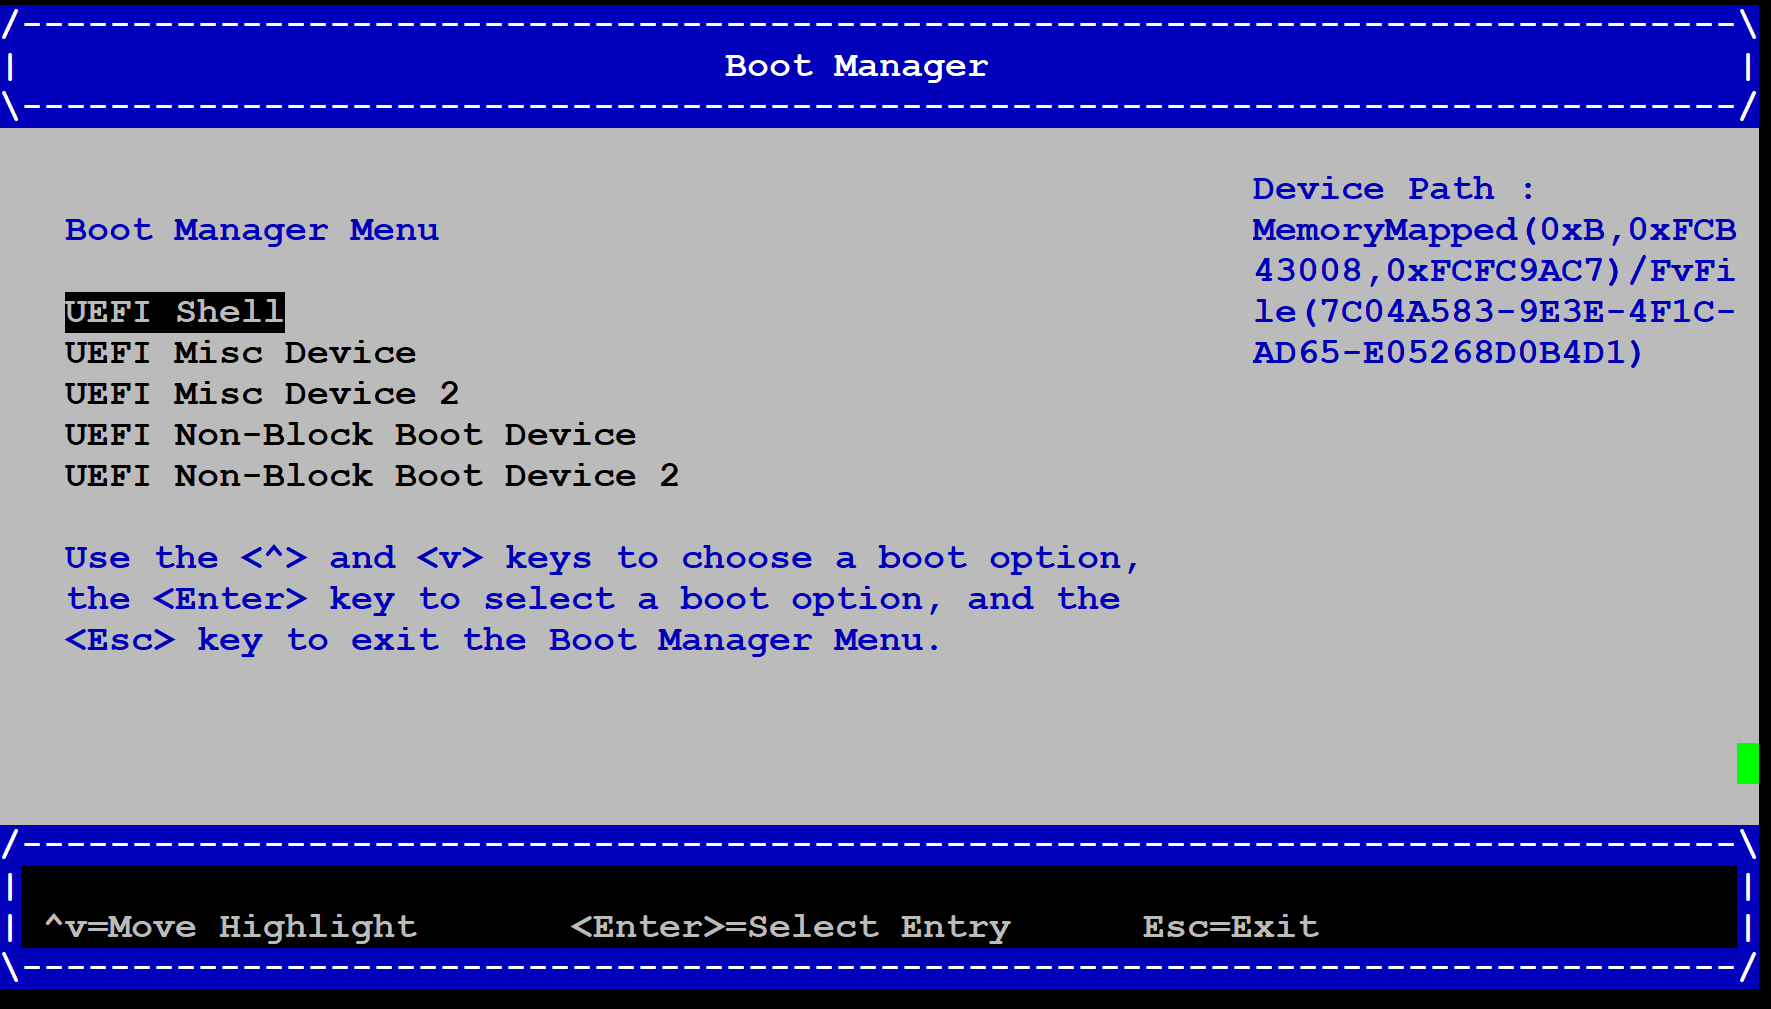
The platform boots into the UEFI shell (press the
ENTERkey to speed up the boot process if desired):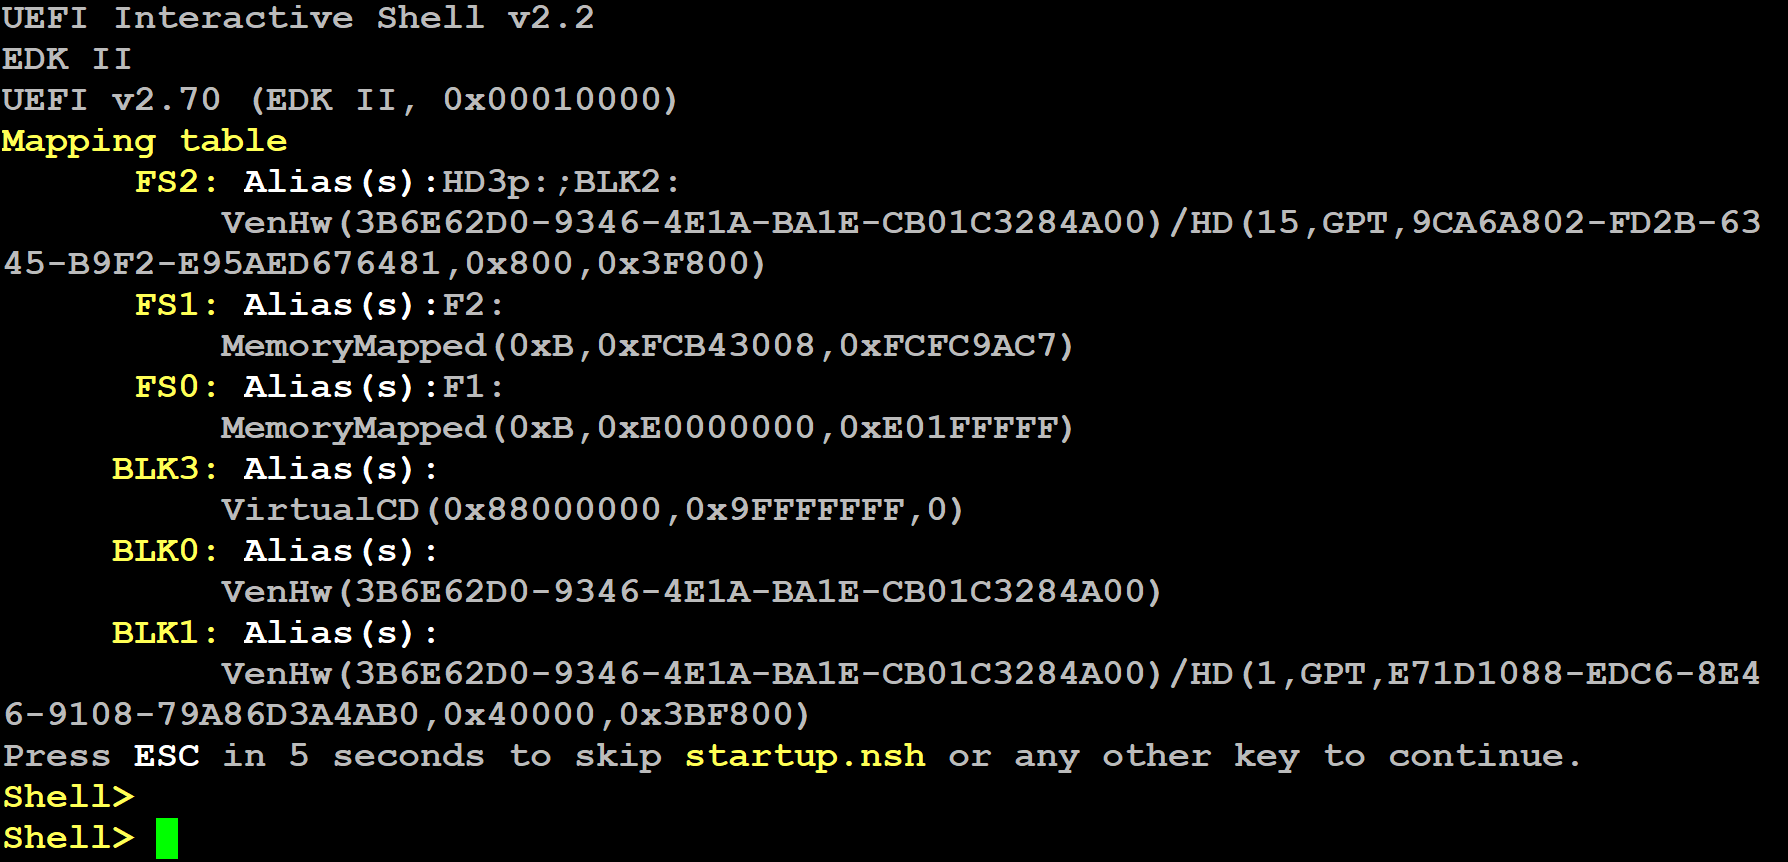
When the UEFI shell prompt appears, dump the ACPI content by running the command
acpiviewas illustrated on the next image: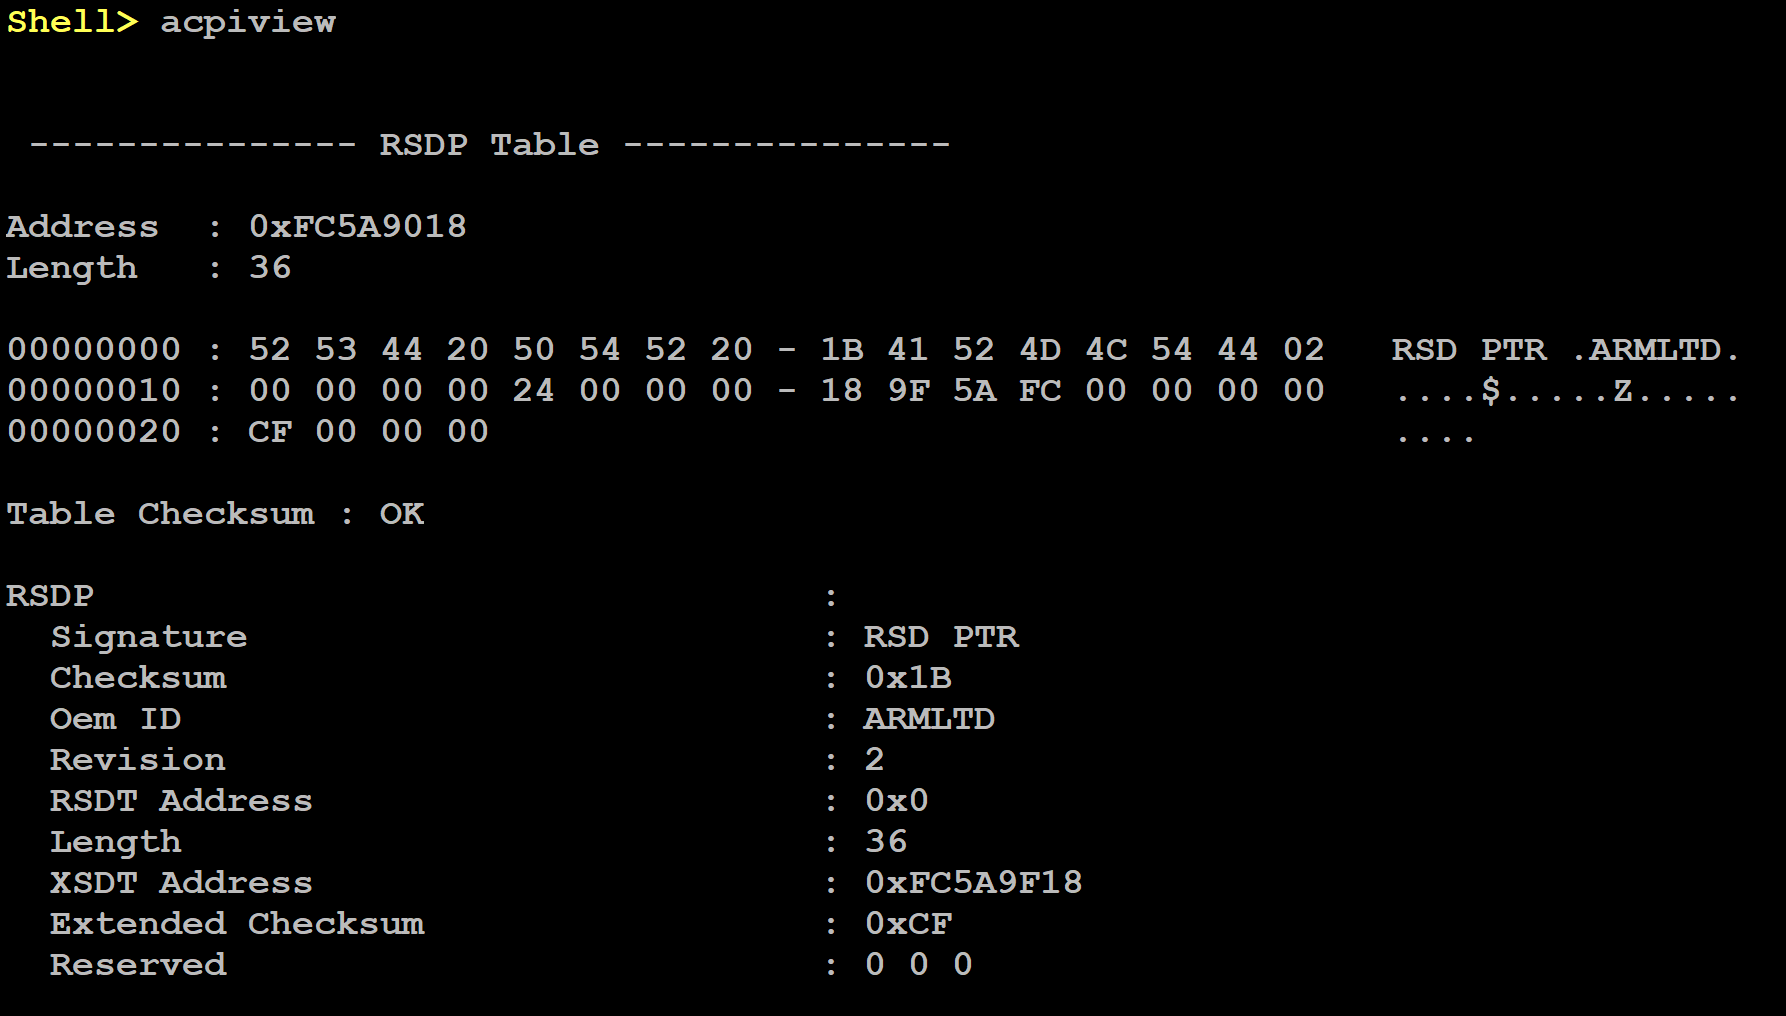
It is possible to filter the output to a single ACPI table by specifying a single table name. To do this, run the command acpiview -s <TABLE-NAME>, where <TABLE-NAME> can be any of the following values: FACP, DSDT, DBG2, GTDT, SPCR, APIC, PPTT or SSDT.
Note
This test is specific to Debian with UEFI ACPI support only. An example of the expected test result for this test is illustrated in the related Large Screen Compute Platform Expected Test Results document section.
Verify PPTT ACPI table content in Debian shell
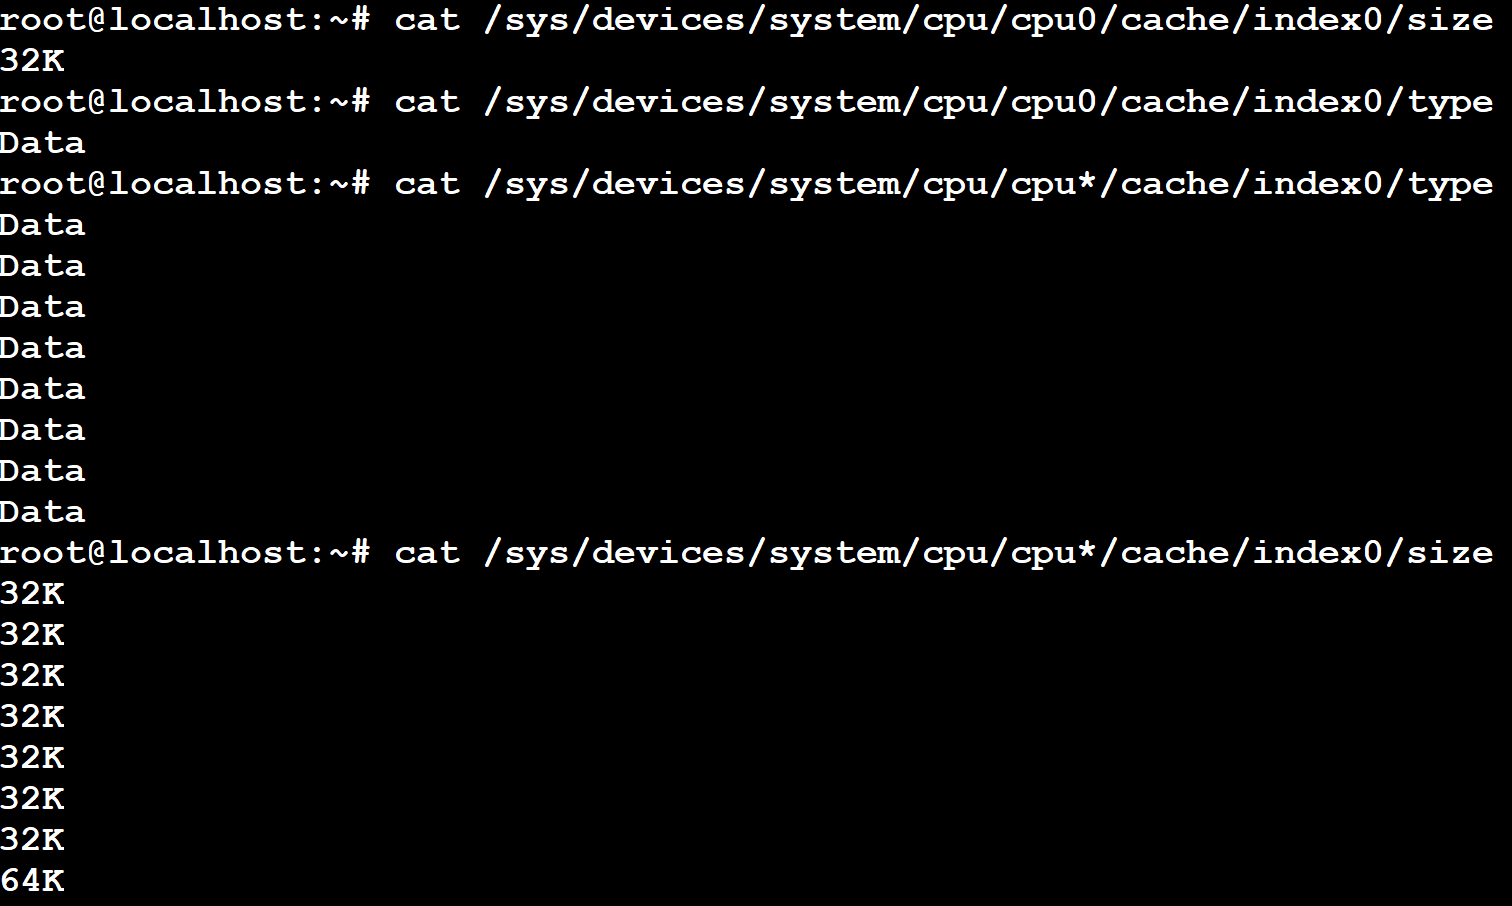
The following screenshot shows how to dump the data cache information of the CPU cores while in Debian shell (command can be run on the terminal_uart_ap window):
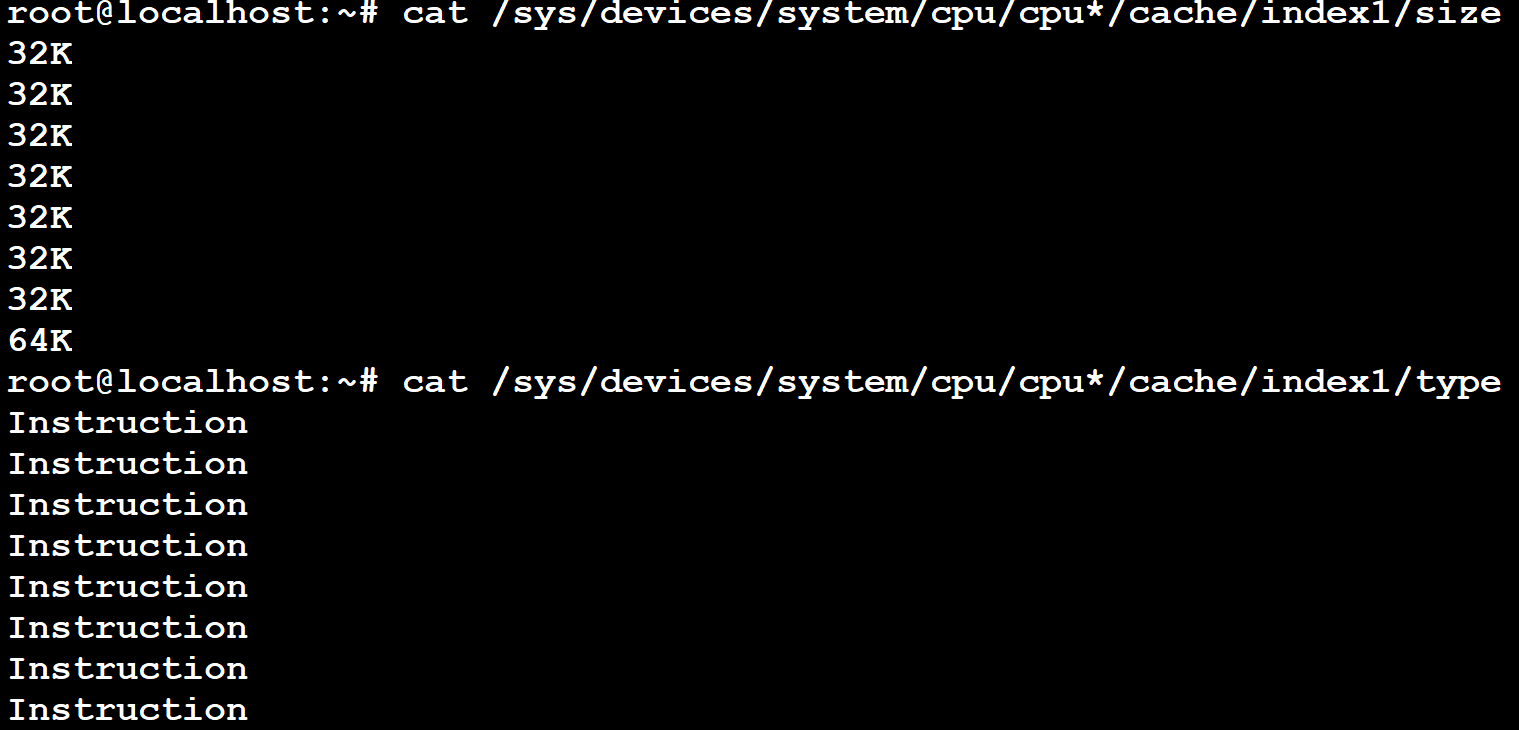
The following screenshot shows how to dump the instruction cache information of the CPU cores while in Debian shell (command can be run on the terminal_uart_ap window):
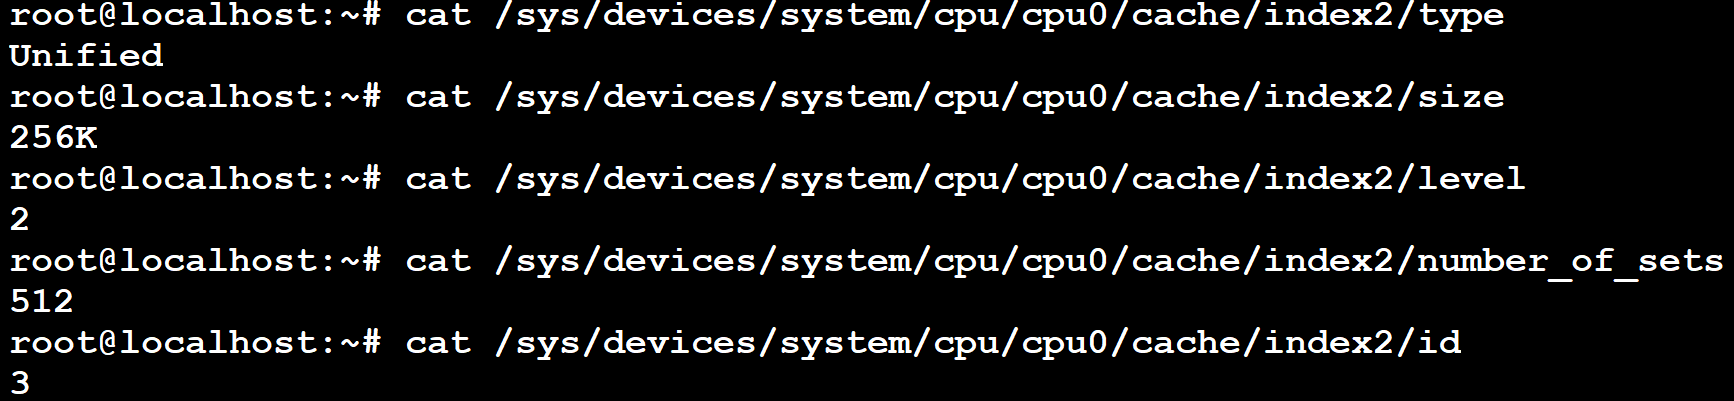
The following screenshot shows how to dump the L2 cache information of the CPU cores while in Debian shell (command can be run on the terminal_uart_ap window):
Note
This test is specific to Debian with UEFI ACPI support only.
Debugging on Arm Development Studio
This section describes the steps to debug the TC software stack using Arm Development Studio.
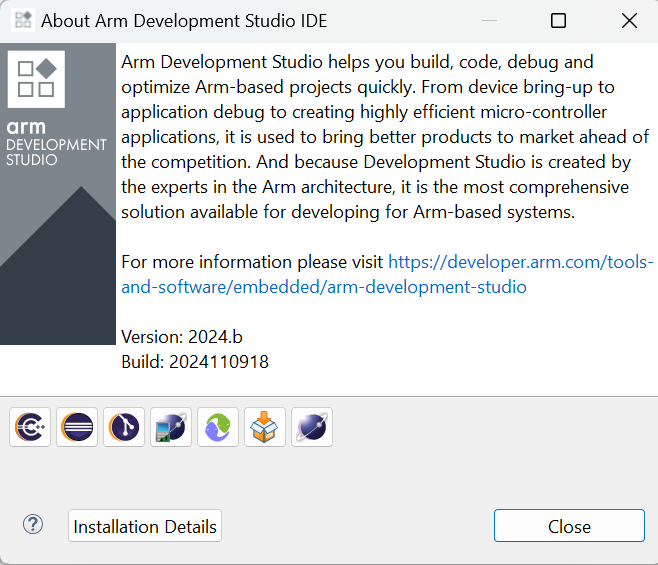
Arm DS version
This section applies to the following Arm DS version/build:
Note
Arm DS is only available to licensee partners. Please contact Arm to have access (support@arm.com).
Attach and Debug
Build the target with debug enabled (the file
<TC_WORKSPACE>/build-scripts/configcan be configured to enable debug);Run the distro as described in the section
Running the software on FVPwith the extra parameters-- -Ito attach to the debugger. The full command should look like the following:./run-scripts/tc3/run_model.sh -m <model binary path> -d debian-official -- -I
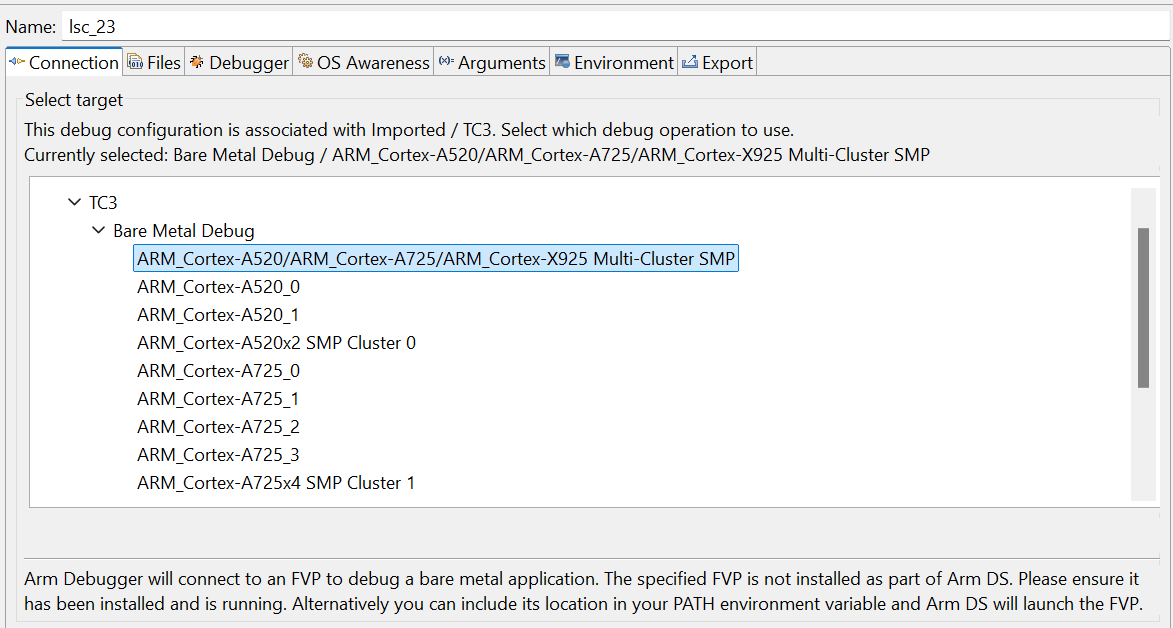
Select the target
Arm FVP -> TC3 -> Bare Metal Debug -> ARM_Cortex-A520/ARM_Cortex-A725/ARM_Cortex-X925 Multi-Cluster SMP;After connection, use the options in debug control console (highlighted in the below diagram) or the keyboard shortcuts to
step,runorhalt;To add debug symbols, right click on target ->
Debug configurationsand underfilestab add path toelffiles;Debug options such as
break points,variable watch,memory viewand so on can be used.
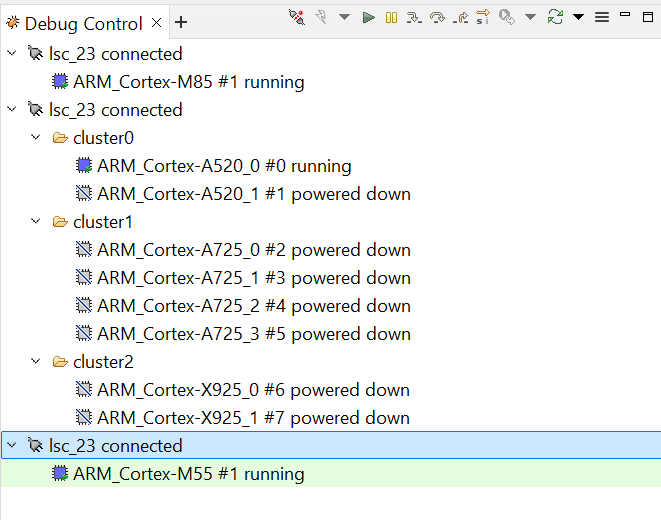
Note
This configuration requires Arm DS version 2024.b or later.
Switch between SCP and AP
Right click on target and select
Debug Configurations;Under
Connection, selectCortex-M85for SCP or any of the remaining targets to attach to a specific AP (please refer to the previous note regarding the matching between the used codenames and actual product names);Press the
Debugbutton to confirm and start your debug session.
Feature Guide
Set up TAP interface
This section details the steps required to set up the TAP interface on the host to enable model networking.
The following method relies on libvirt handling the network bridge. This solution provides a safer approach in which, in cases where a bad configuration is used, the primary network interface should continue operational.
Steps to set up the TAP interface
To set up the TAP interface, please follow the next steps (unless otherwise mentioned, all commands are intended to be run on the host system):
Install
libvirton your development host system:sudo apt-get update && sudo apt-get install libvirt-daemon-system libvirt-clients
The host system should now list a new interface with a name similar to
virbr0and an IP address of192.168.122.1. This can be verified by running the commandifconfig -a(or alternativelyip a sfor newer distributions) which will produce an output similar to the following:$ ifconfig -a virbr0: flags=4099<UP,BROADCAST,MULTICAST> mtu 1500 inet 192.168.122.1 netmask 255.255.255.0 broadcast 192.168.122.255 ether XX:XX:XX:XX:XX:XX txqueuelen 1000 (Ethernet) RX packets 0 bytes 0 (0.0 B) RX errors 0 dropped 0 overruns 0 frame 0 TX packets 0 bytes 0 (0.0 B) TX errors 0 dropped 0 overruns 0 carrier 0 collisions 0 virbr0-nic: flags=4098<BROADCAST,MULTICAST> mtu 1500 ether XX:XX:XX:XX:XX:XX txqueuelen 1000 (Ethernet) RX packets 0 bytes 0 (0.0 B) RX errors 0 dropped 0 overruns 0 frame 0 TX packets 0 bytes 0 (0.0 B) TX errors 0 dropped 0 overruns 0 carrier 0 collisions 0 $
Create the
tap0interface:sudo ip tuntap add dev tap0 mode tap user $(whoami) sudo ifconfig tap0 0.0.0.0 promisc up sudo brctl addif virbr0 tap0
Run the FVP model providing the additional parameter
-t "tap0"to enable the TAP interface:./run-scripts/tc3/run_model.sh -m <model binary path> -d debian-official -t "tap0"
Before proceeding, please allow FVP model to fully boot.
Once the FVP model boots, the running instance should get an IP address similar to
192.168.122.62;Validate the connection between the host
tap0interface and the FVP model by running the following command on the fvp-model via theterminal_uart_apwindow:ping 192.168.122.1
Alternatively, it is also possible to validate if the fvp-model can reach a valid internet gateway by pinging, for instance, the IP address
8.8.8.8instead.
Steps to graceful disable and remove the TAP interface
To revert the configuration of your host system (removing the tap0 interface), please follow the next steps:
Remove the
tap0from the bridge configuration:sudo brctl delif virbr0 tap0
Disable the bridge interface:
sudo ip link set virbr0 down
Remove the bridge interface:
sudo brctl delbr virbr0
Remove the
libvirtpackage:sudo apt-get remove libvirt-daemon-system libvirt-clients
Note
If the TAP interface does not function as expected after removing libvirt and setting up the TAP interface again using Steps to set up the TAP interface, reboot the host machine.
Copyright (c) 2025, Arm Limited. All rights reserved.